Overview
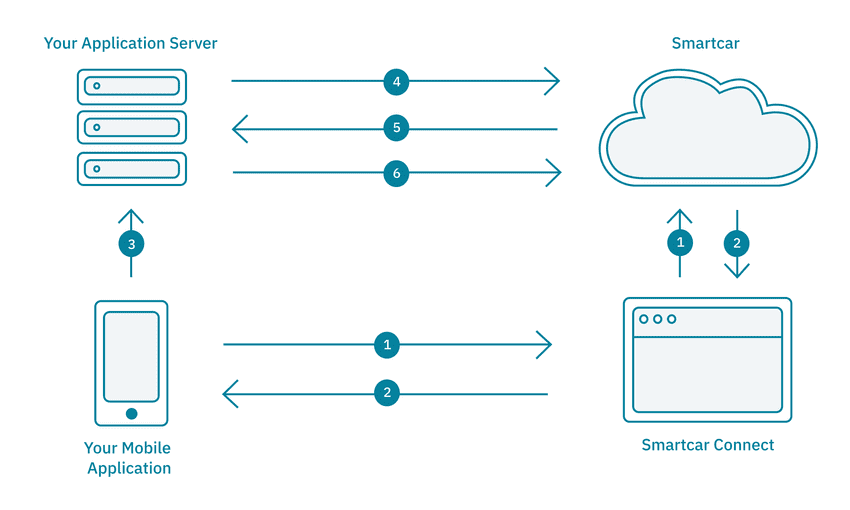
- The Mobile Application launches a
SafariViewwith Smartcar Connect to request access to a user’s vehicle. On Connect, the user logs in with their vehicle credentials and grants the Application access to their vehicle. - The
SafariViewis redirected to a specifiedREDIRECT_URIalong with auser_idandstate. This will be the custom scheme set on the application. The Smartcar iOS SDK receives the response in a view listening for the specified custom scheme URI, and passes it to the Mobile Application. - The Mobile Application sends the received
user_idto the Application’s backend service for storage. - The Application’s backend authenticates with the Smartcar API using the OAuth 2.0 Client Credentials flow to obtain an application-level access token.
- Using the access token and the
sc-user-idheader, the Application can now send requests to the Smartcar API. It can access protected resources and send commands to and from the user’s vehicle via the backend service.
Prerequisites
- Sign up for a Smartcar account.
- Make a note of your
CLIENT_IDandCLIENT_SECRETfrom the Configuration section on the Dashboard. - Add a custom scheme redirect URI to your application configuration.
- Add the
appServerredirect URI from step 2 below to your application configuration.
For iOS, we require the custom URI scheme to be in the format of
sc + clientId + :// + hostname.
For now, you can just set it to sc + clientId + ://exchange.Please see our Connect Docs for more information.Setup
- Clone our repo and install the required dependencies:
- Set the following constants in
Constants.swift. We’re settingappServertohttp://localhost:8000to pass the authorizationcodefrom the Handle the Response step later on in the tutorial to our backend.Constants.swift
Build your Connect URL
Instantiate aSmartcarAuth object in the viewdidLoad function of the ViewController.
The iOS application will launch a WebView with Connect to request access to a user’s vehicle.
On Connect, the user logs in with the username and password for their vehicle’s connected services account
and grants the application access to their vehicle.
To launch Connect, we can use the launchAuthFlow function that our SmartcarAuth object has access to. We can place
this within the connectPressed action function.
ViewController.swift
Registering your Custom Scheme
Once a user has authorized the application to access their vehicle, the user is redirected to theREDIRECT_URI with an authorization code as a query parameter.
iOS applications use custom URI schemes to intercept calls and launch the relevant application. This is defined within the Info.plist.
- Open up
Info.plistand click on the grey arrow next to URL types. - Next, click on the grey arrow next to the
Item 0dictionary andURL Schemesarray. - Finally, set your
Item 0string to the redirect URI you set up in the Prerequisites section (i.e. ‘sc’ + clientId).

Handle the response
- The iOS application will now receive the request in the
application:(_:open:options:)function within the AppDelegate.AppDelegate.swift - Using the iOS SDK, the application can receive the code in the
completion callbackpassed into theSmartcarAuthobject.AppDelegate.swift
Launching Connect
Build your application in XCode and click on the Connect your vehicle button.This tutorial configures Connect to launch in
test mode by default.
In test mode, any username and password is valid for each brand.read_vehicle_info in this case.
Once you have logged in and accepted the permissions, you should see your authorization code printed to your console.
Sending the user_id to your backend
After the user completes the Connect flow, your iOS application receives auser_id. Send this to your backend service for storage — your backend will use it as the sc-user-id header when making API requests on behalf of this user.
ViewController.swift
Getting data from a vehicle
Once your backend has theuser_id and an application-level access token, it can send requests to a vehicle using the Smartcar API. The iOS app will
have to send a request to the backend service which in turn sends a request to Smartcar. We have to do this because
our frontend does not have the access token.
Assuming our backend has a /vehicle endpoint that returns the information of a user’s vehicle, we can make this query in
our completion callback and segue into another view to show the returned vehicle attributes.
ViewController.swift
Setting up your backend
Now that our frontend is complete, we will need to create a backend service that stores theuser_id and handles API authentication. Your backend will use the OAuth 2.0 Client Credentials flow to obtain an application-level access token and make requests to vehicles.
You can use any of our backend SDKs below to set up the service.
When setting up the environment variables for your backend SDK, make sure to set
REDIRECT_URI to the custom scheme
used for this tutorial i.e. sc + "clientId" + ://exchange.