Overview
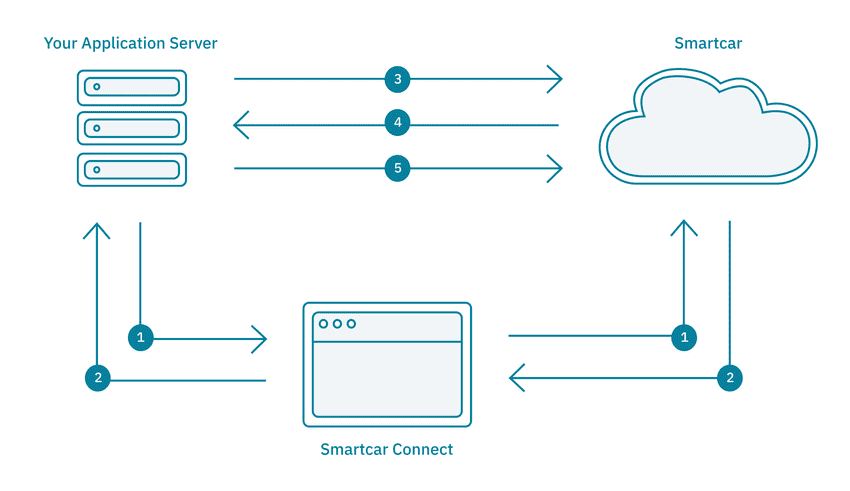
- The Application redirects the user to Smartcar Connect to request access to the user’s vehicle. In Connect, the user logs in with their vehicle credentials and grants the Application access to their vehicle.
- The user’s browser is redirected to a specified
REDIRECT_URI. The Application Server, which is listening at theREDIRECT_URI, will retrieve theuser_idandstatefrom query parameters sent to theREDIRECT_URI. - The Application authenticates with the Smartcar API using the OAuth 2.0 Client Credentials flow, exchanging its
CLIENT_IDandCLIENT_SECRETfor an application-level access token. - Using the access token and the
sc-user-idheader, the Application can now send requests to the Smartcar API. It can access protected resources and send commands to and from the user’s vehicle via the backend service.
Prerequisites
- Sign up for a Smartcar account.
- Make a note of your
CLIENT_IDandCLIENT_SECRETfrom the Configuration section on the Dashboard. - Add the following
REDIRECT_URIto your application configuration:http://localhost:8000/exchange
Setup
-
Clone the repo for the SDK you want to use and install the required dependencies:
- You will also have to set the following environment variables
If you are using Windows, ensure you are appropriately setting environment variables for your shell.
Please refer to this post which details how to set environment variables on Windows.
Build your Connect URL
-
Instantiate a
Smartcarobject in the constructor of the App component.
Feel free to set
mode to simulated or live where you instantiate your Smartcar object to
connect to a simulated or real vehicle.-
A Server-side rendered application will redirect to Smartcar Connect to request access to a user’s vehicle.
On Connect, the user logs in with the username and password for their vehicle’s connected services account
and grants the application access to their vehicle.
To launch Connect, we need to redirect the user to the appropriate URL. We can make use of the
AUTHORIZATION_URLfunction in our Smartcar object and redirect the user to the URL to launch the Connect flow.
Handle the response
Once a user has authorized the application to access their vehicle, the user is redirected to theREDIRECT_URI
with a user_id and state as query parameters. In the previous section, we had set our REDIRECT_URI as localhost:8000/exchange.
Now, our server can be set up as follows to receive and store the user_id.
Launching Connect
Let’s try authenticating a vehicle! Restart your server, open up your browser and go tohttp://localhost:8000/login
This tutorial configures Connect to launch in
test mode by default.
In test mode, any username and password is valid for each brand.read_vehicle_info in this case.
Once you have logged in and accepted the permissions, you should see your authorization code printed to your console.
Getting your application access token
Smartcar uses the OAuth 2.0 Client Credentials flow for API authentication. Your application obtains a single access token that works across all connected vehicles.
user_id from the Connect redirect and redirect to the /vehicle route.
Getting data from a vehicle
-
Once the backend service has an application-level access token and the
user_id, it can send requests to a vehicle using the Smartcar API. First we’ll need to fetch the connections for this user, then fetch vehicle attributes. After receiving the vehicle attributes, we can render them in a simple table on the page. -
Restart your sever and head back to
http://localhost:8000/loginto go through Connect and make your first API request!