

In this guide, we’ll dive into how you can set up Smartcar’s scheduled webhooks on the integration platform, Pipedream.
Webhooks allow apps to receive push notifications and regular updates from connected cars. Mobility businesses use Smartcar’s webhooks to retrieve information from vehicles at set intervals without having to run a time-based job scheduler to make API requests. It also means developers don’t have to write any code to manage tokens.
🔋Smart charging providers find great value in using webhooks to start a charging session based on battery levels or grid load at any given time or charging schedules set by EV owners.
💰 Car insurance providers use scheduled webhooks to verify their policyholders’ mileage, garaging location, and VIN daily or monthly.
⚒ Car rental and maintenance companies manage their operations using webhooks to automatically retrieve data like a vehicle’s location, odometer, fuel tank level, and tire pressure daily or weekly.
Of course, these are only some of the many ways a mobility application can use Smartcar’s webhooks to get timely and accurate data.
This guide dives specifically into how developers can set up our schedule-based webhooks, which is only available on our Enterprise plan.
🧰 To use this guide, you’ll need a Smartcar account and a Pipedream account.
🪝Part I: Configure webhook
Once you’ve created your Pipedream account, you can get started with creating a workflow trigger.
Set the trigger as HTTP/Webhook > HTTP Requests and set the 'HTTP Response' field to 'Return a custom response from your workflow'.
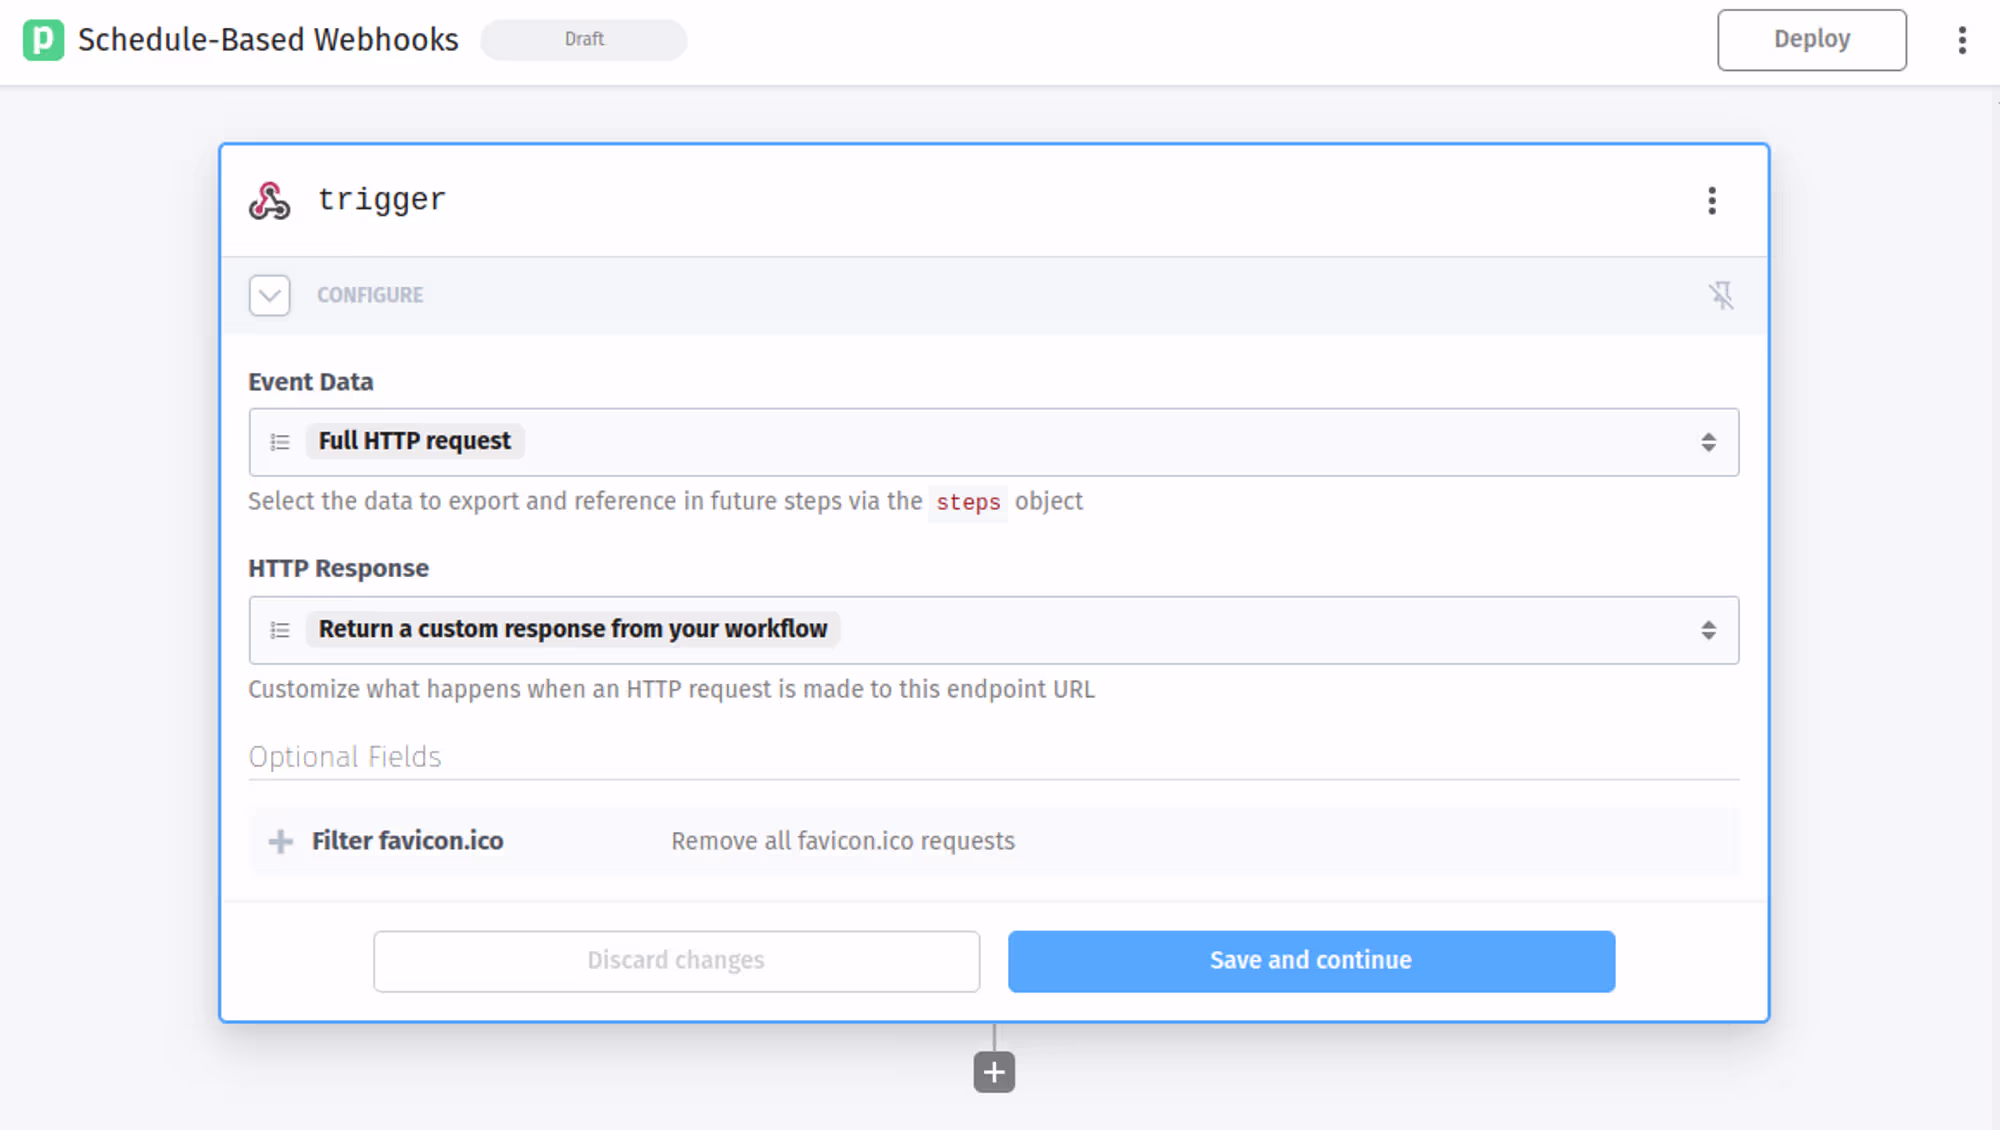
After you hit save and continue, Pipedream will generate a unique URL for you. 💡We’ll be using this in the next step.
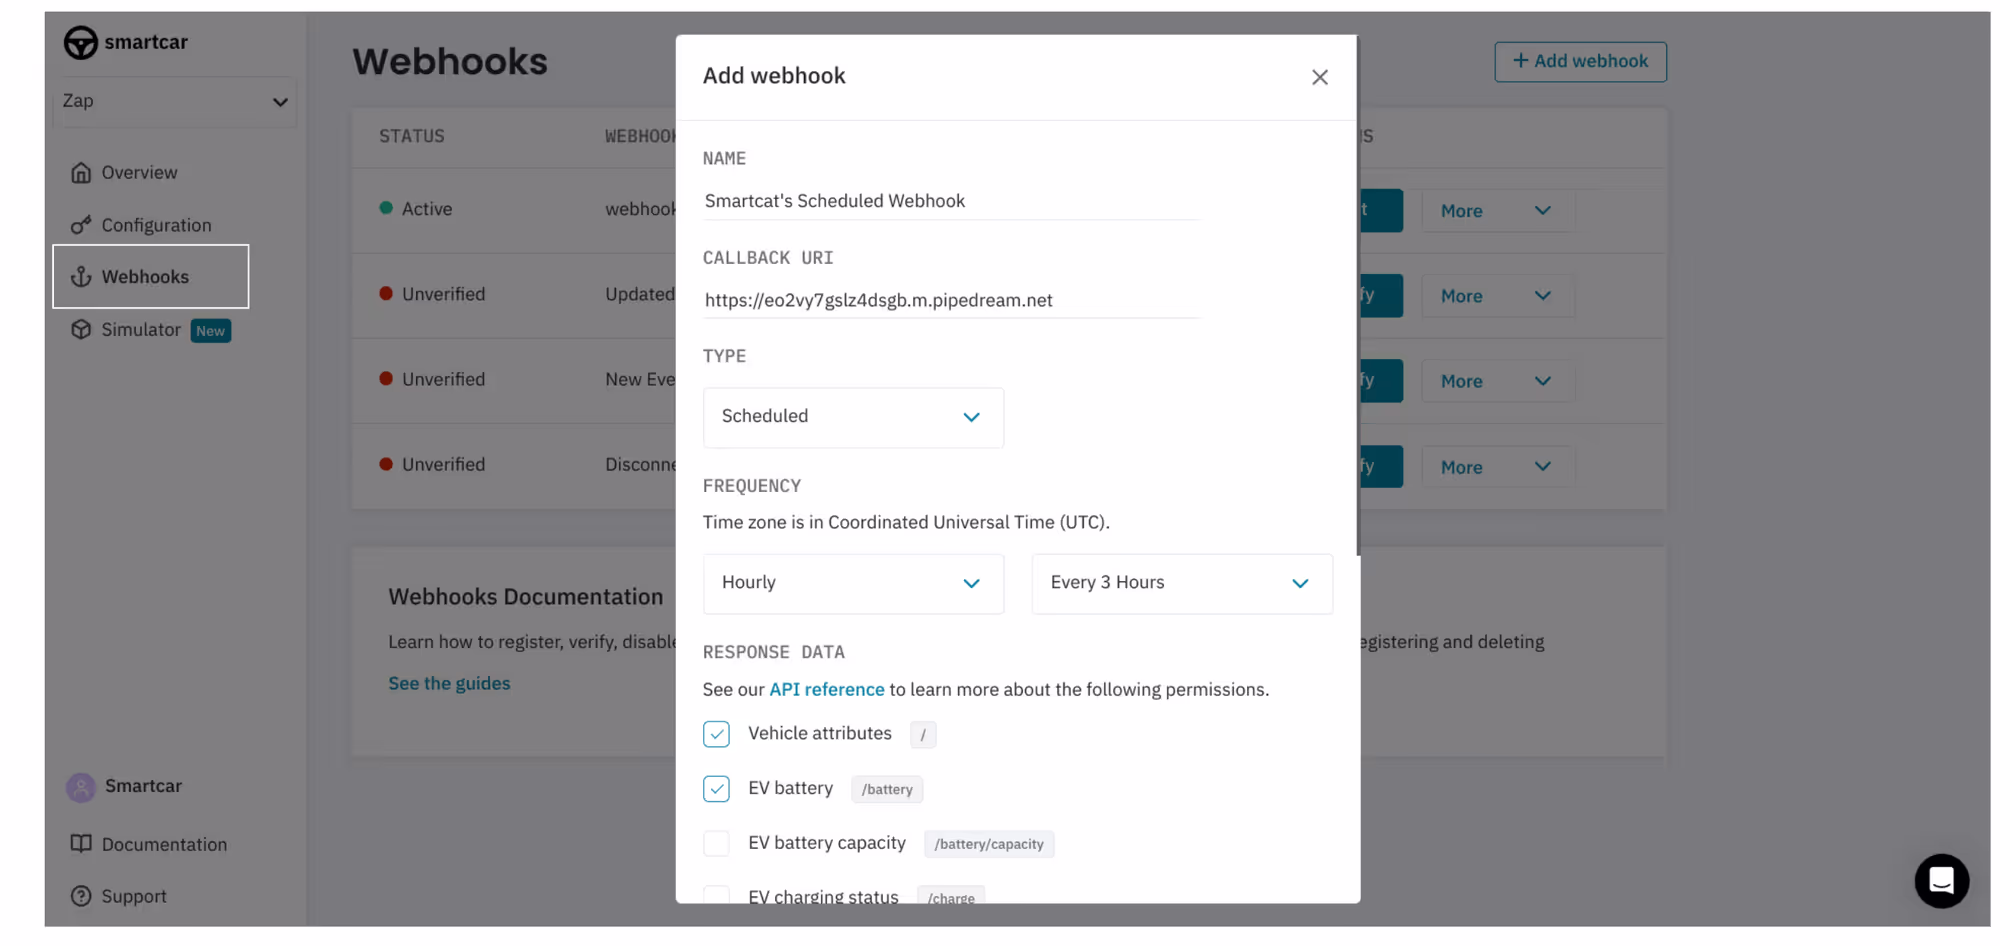
Once you’ve created a Smartcar account, head to the webhooks tab and create your first webhook. Give the webhook a name and paste it into the URL from Pipedream under 'Callback URI'.
Set the 'Type' to 'Scheduled' and select the frequency you want to receive data from vehicles. Select what data you want to receive from a vehicle and units, then hit 'Add Webhook'.
🪝 Part II: Verify webhook
🢣 Step 1
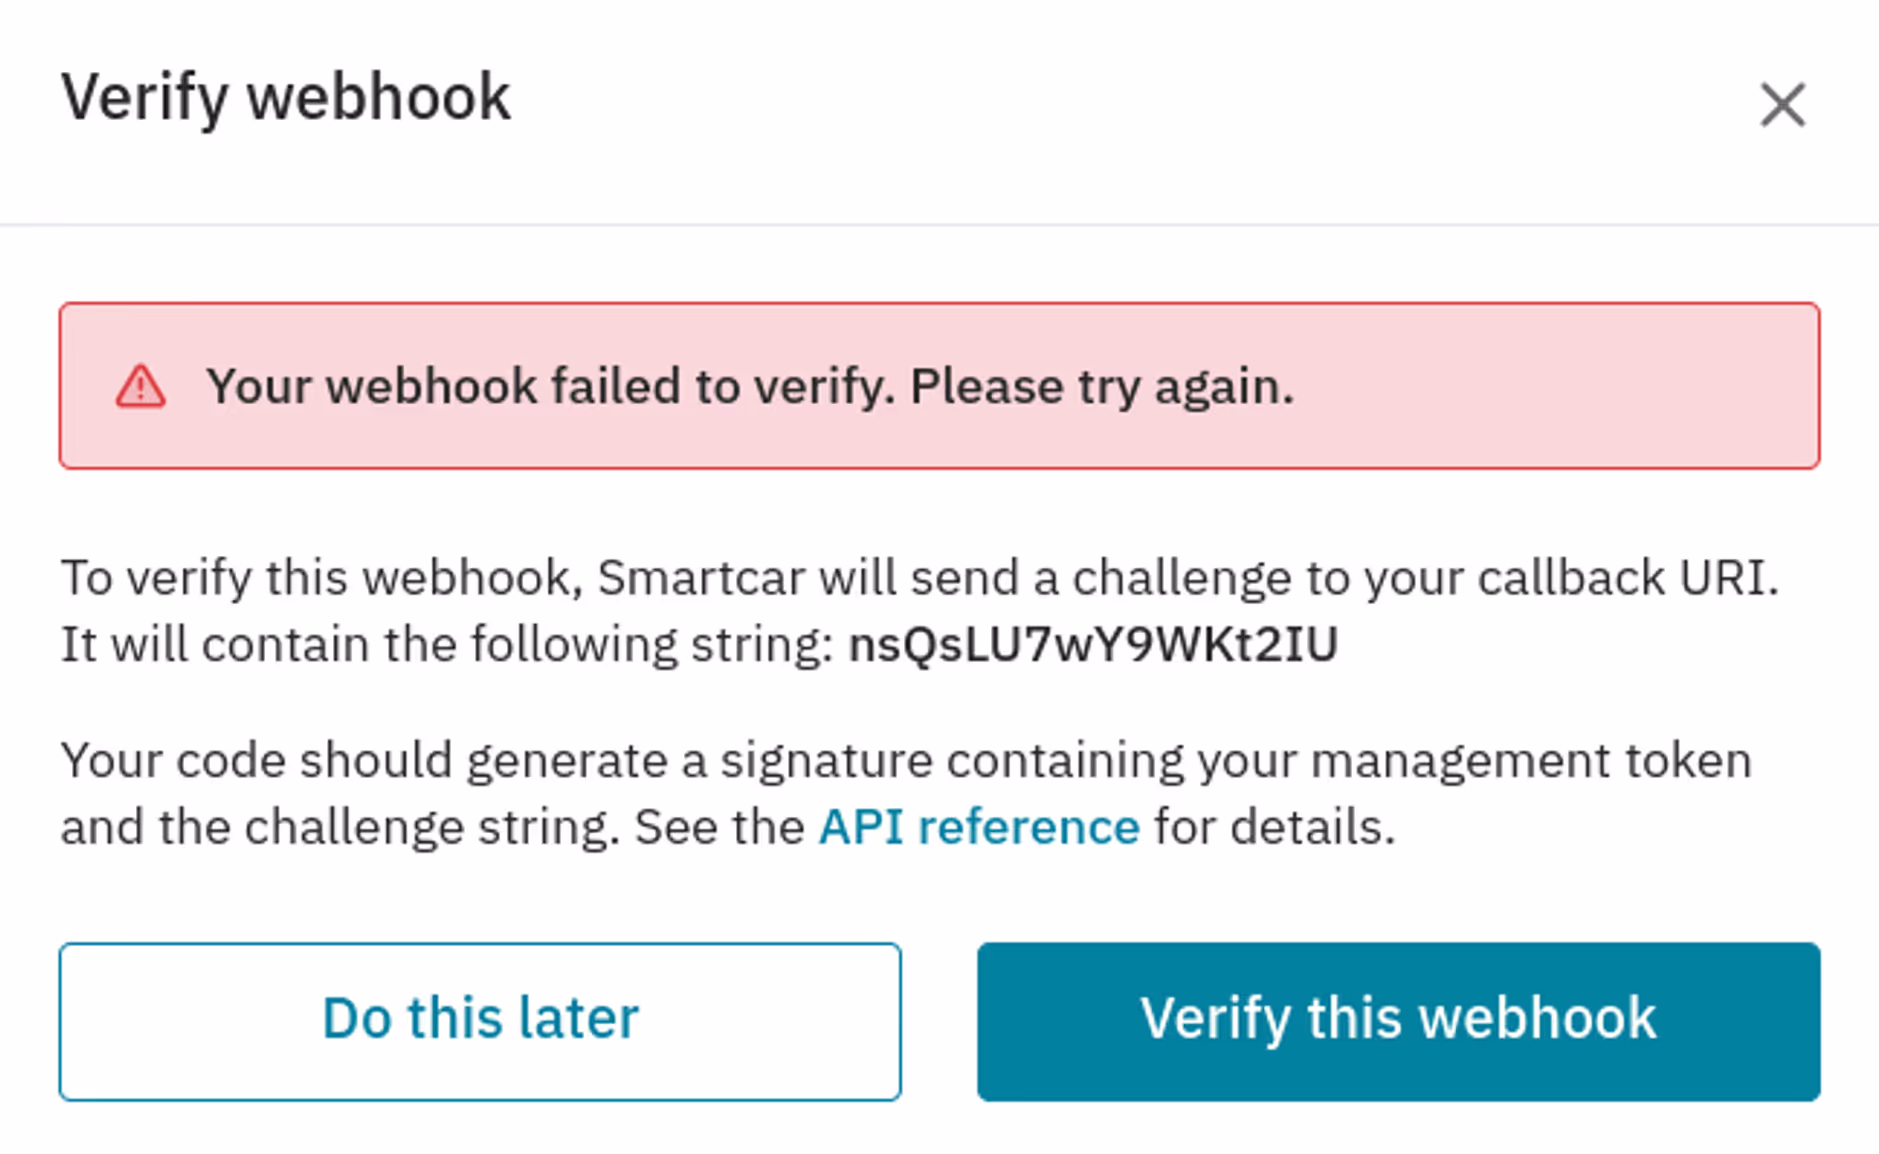
After you've added your webhook, you’ll see a pop-up that will prompt you to click 'Verify this webhook.' This will fail initially — you'll see this displayed in the pop-up as shown below.
🢣 Step 2
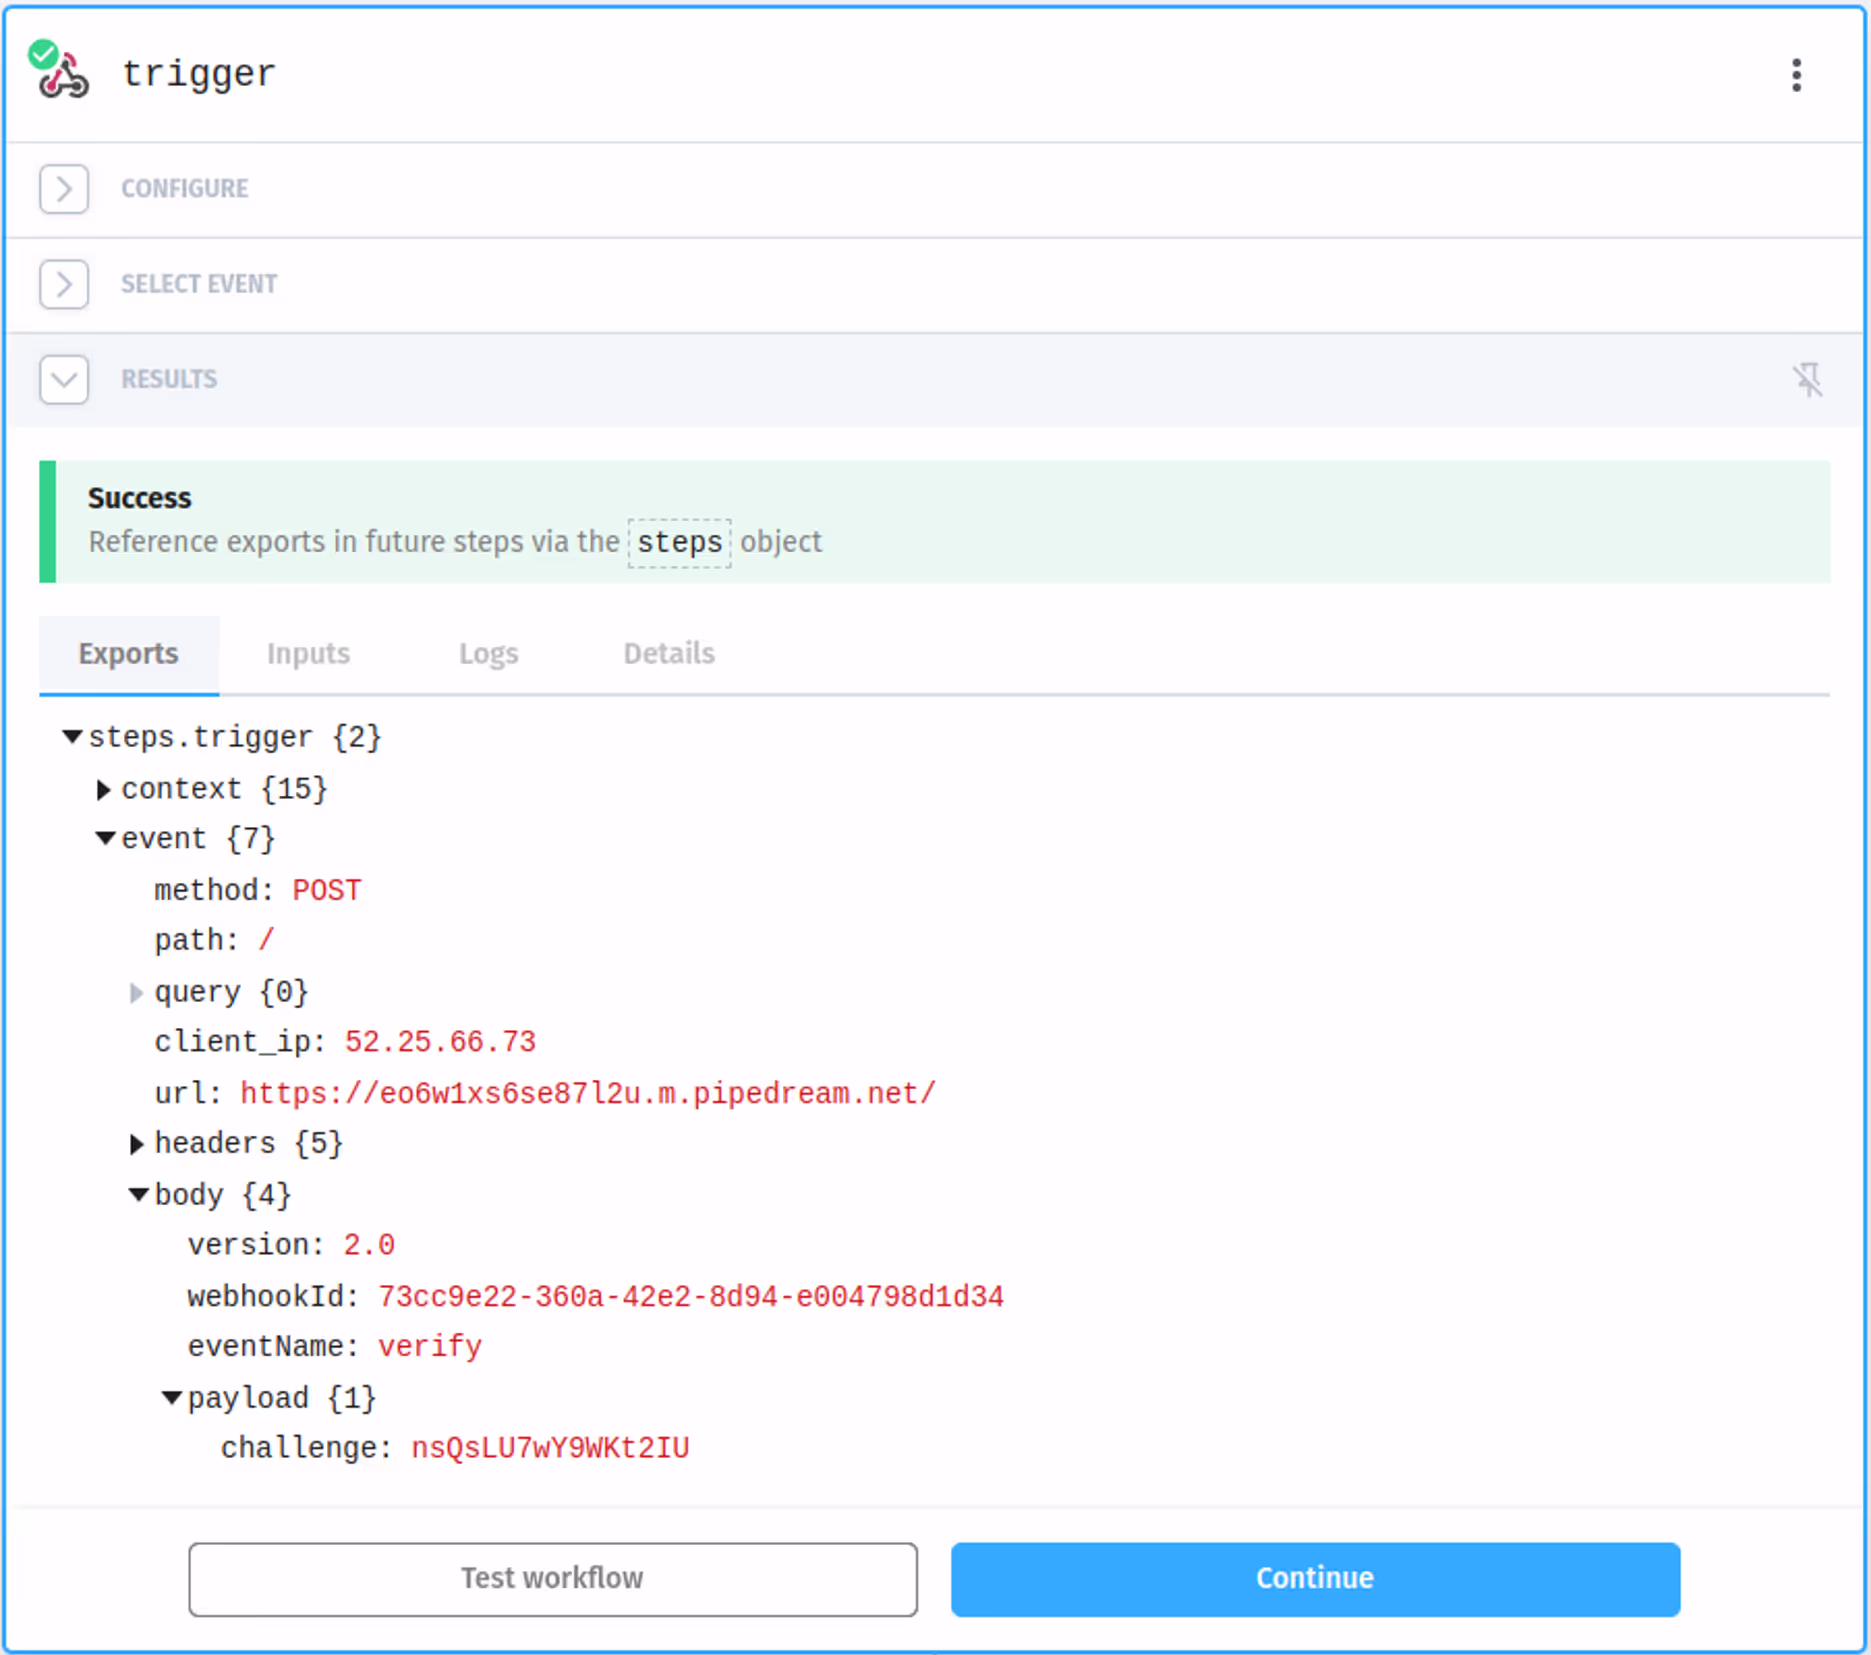
Now, you're going to head back to Pipedream. You should see a new event pop up there.

Select the event in Pipedream and navigate through the body of the event to find the challenge in the payload.
🢣 Step 3
At this point, we’ll need to use some code to generate a signature that will pass the challenge.
We’ll be using Smartcar’s Python SDK in this tutorial going forward, but feel free to use any of our backend SDKs that Pipedream supports!
First, Hit the ‘+’ icon under the ‘Continue’ button.
Next, select ‘Python’ and then ‘Run Python code.’
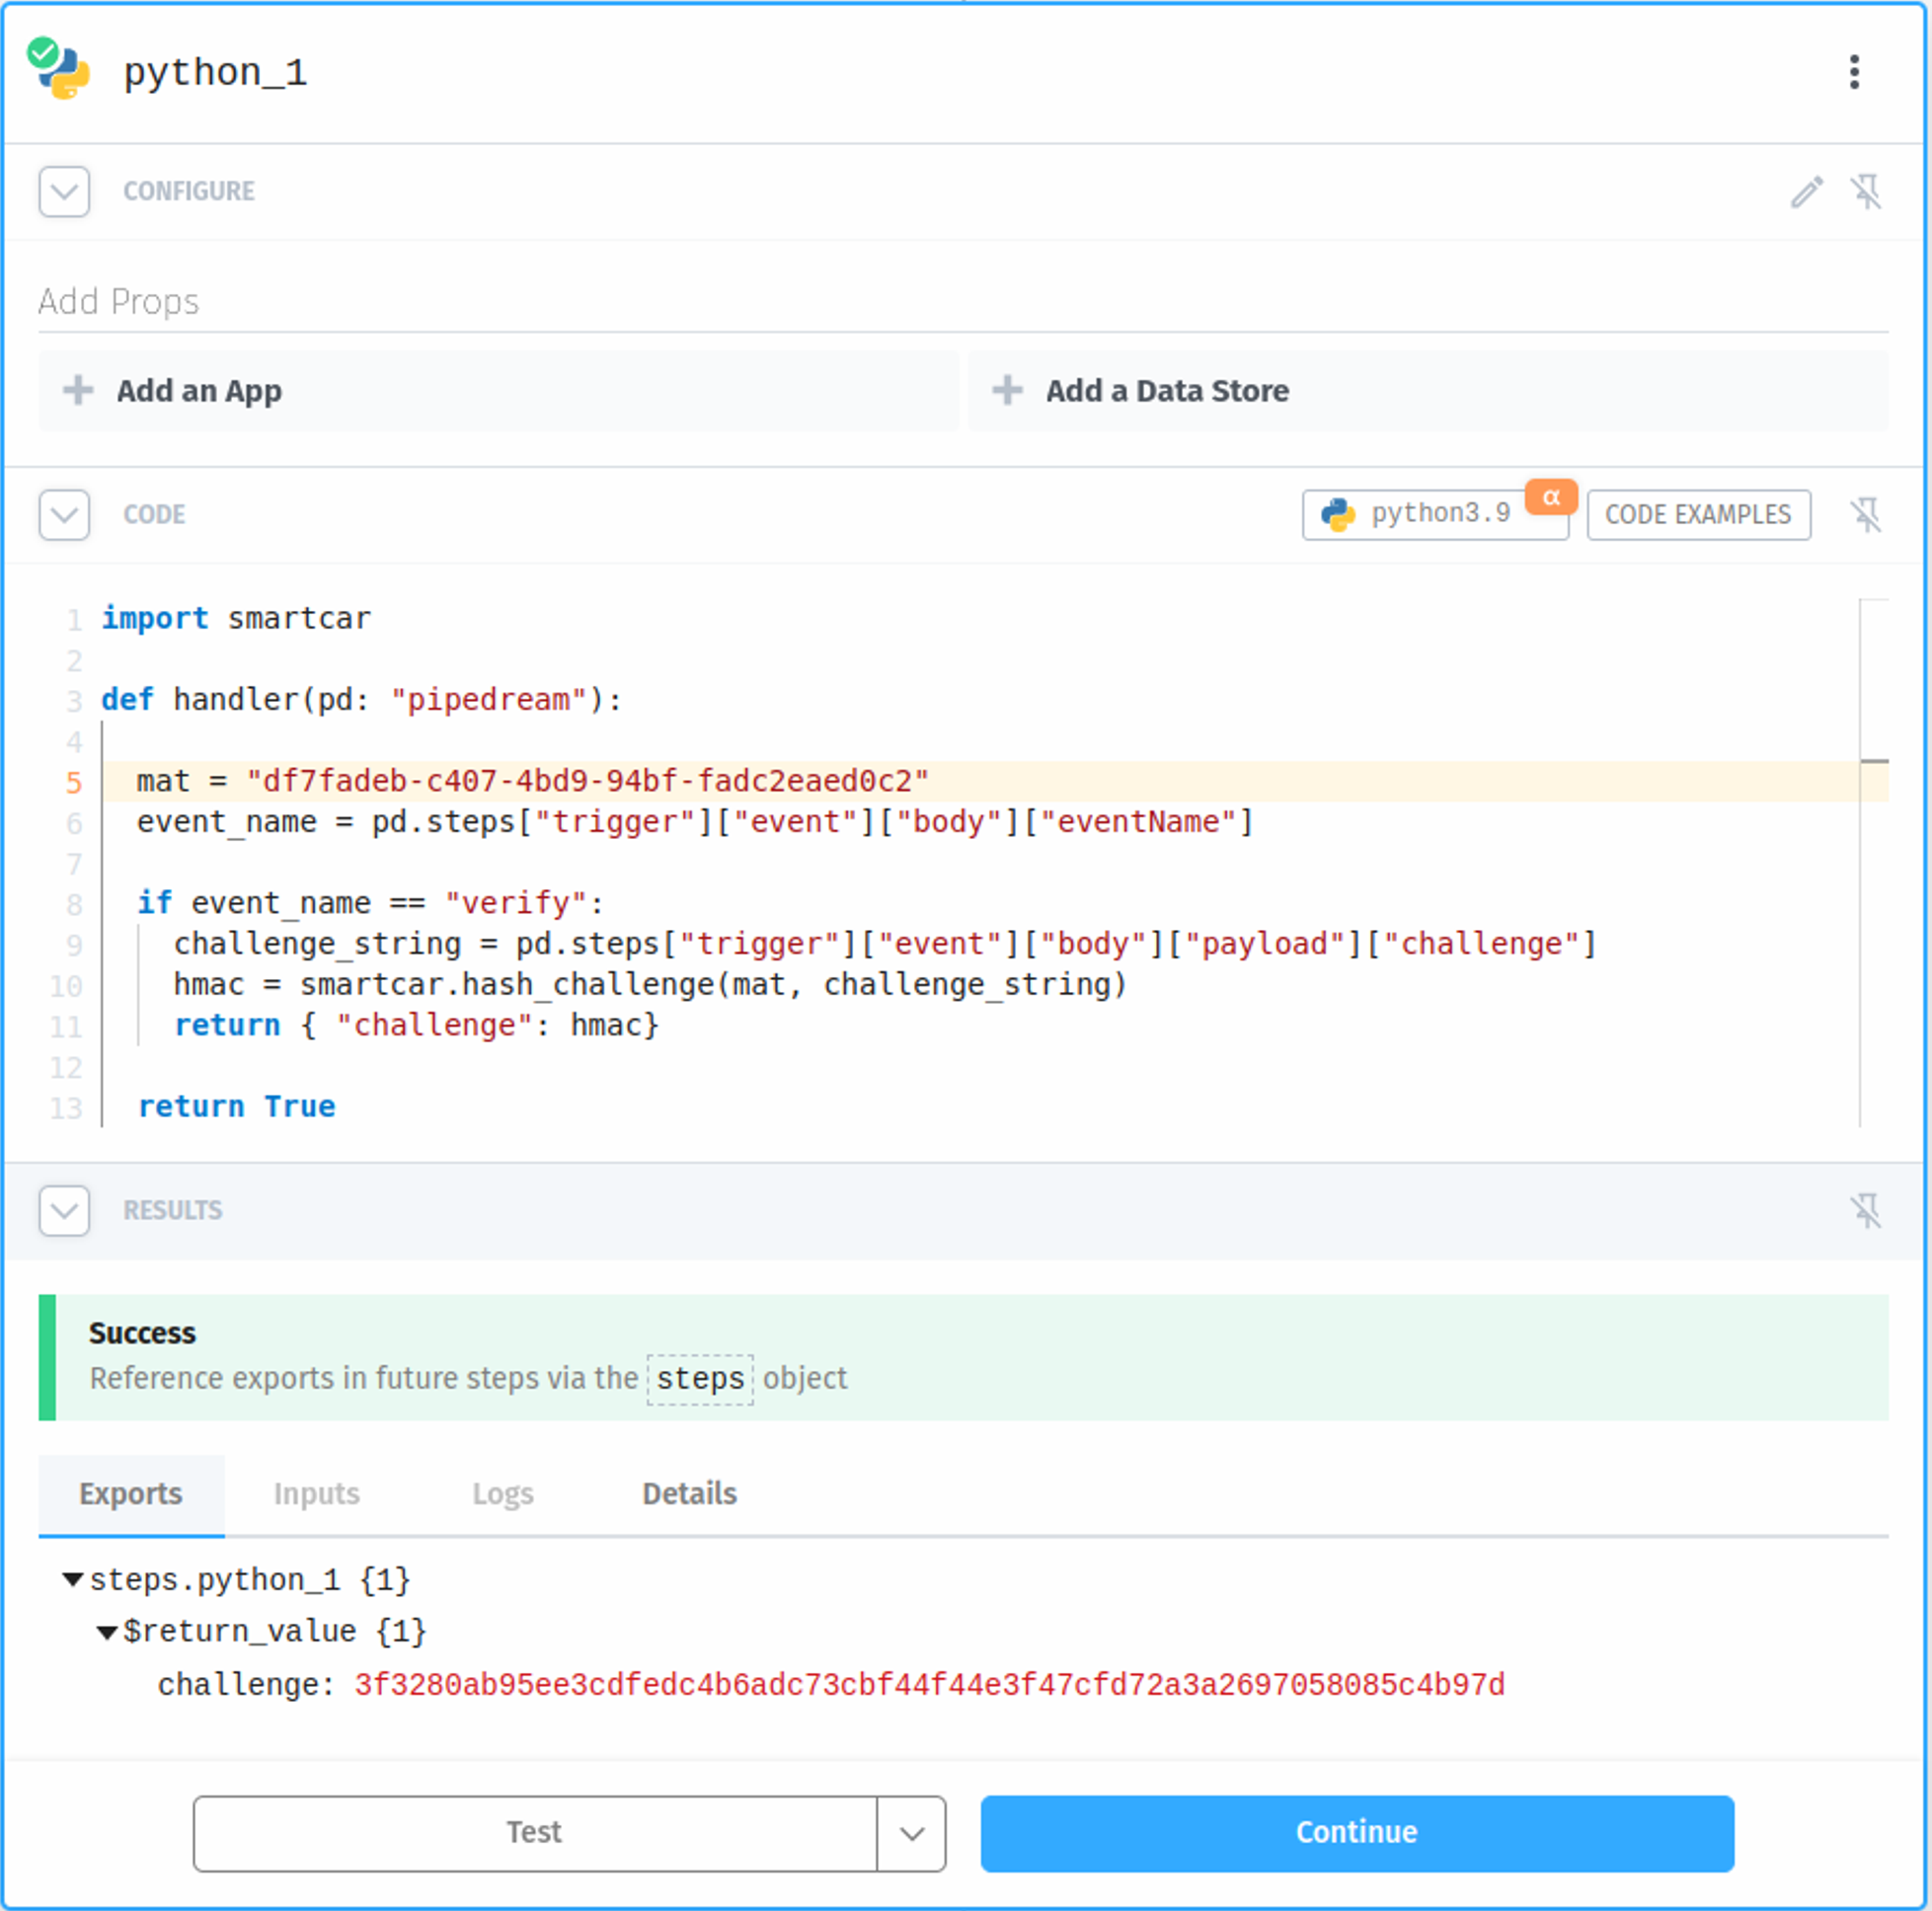
Now, paste the following code to the new step in Pipedream.
You’ll also want to fetch your Management API Token (MAT) from the 'Configuration' tab in the Smartcar Dashboard. Once you've hit added your MAT to the code, hit 'Test'.
If everything runs correctly, you should see a return value following challenge: “some string.” 💡Note that the value following challenge will be different for everyone.
🢣 Step 4
Hit the ‘+’ to add the next step.
Here, we’ll want to return an HTTP Response. You can find this by clicking into ‘HTTP/Webhook’ in Pipedream's app menu.
The 'Return HTTP Response' step responds to the Smartcar verification request with the challenge response generated in the Python step above. To do this, we’ll need to add a 'Response Body' and reference the Python steps’ return value.
Select ‘+ Response Body’ and hit 'select path' for `$return_value` from the dropdown.

After testing this step, you should see `challenge : <HMAC>` in the body of the event. Now you can deploy the workflow.
Once deployed, head back to Smartcar Dashboard and verify your webhook!
🪝 Part III: Process webhook payloads
🢣 Step 1
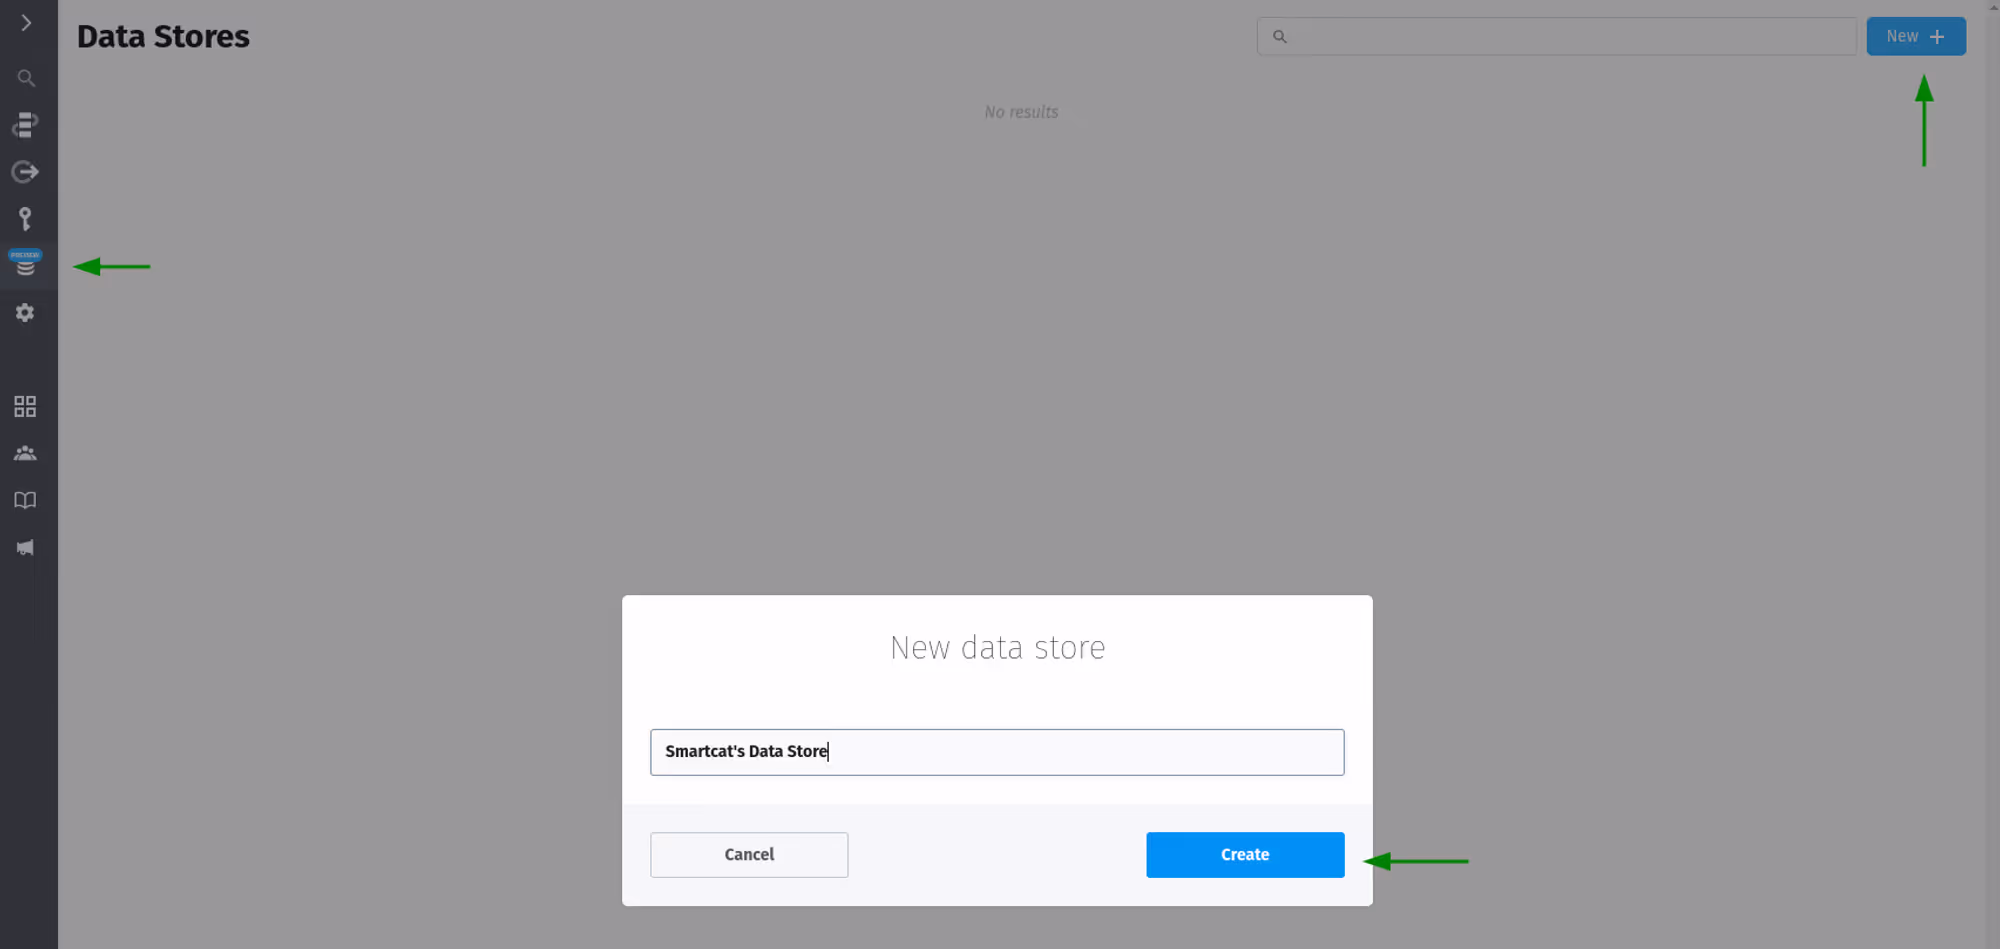
Pipedream provides us with Data Stores as a convenient way to store payloads sent to your scheduled webhook.
To get one set up, select ‘Data Stores’ from the Pipedream navigation bar and create a new data store.
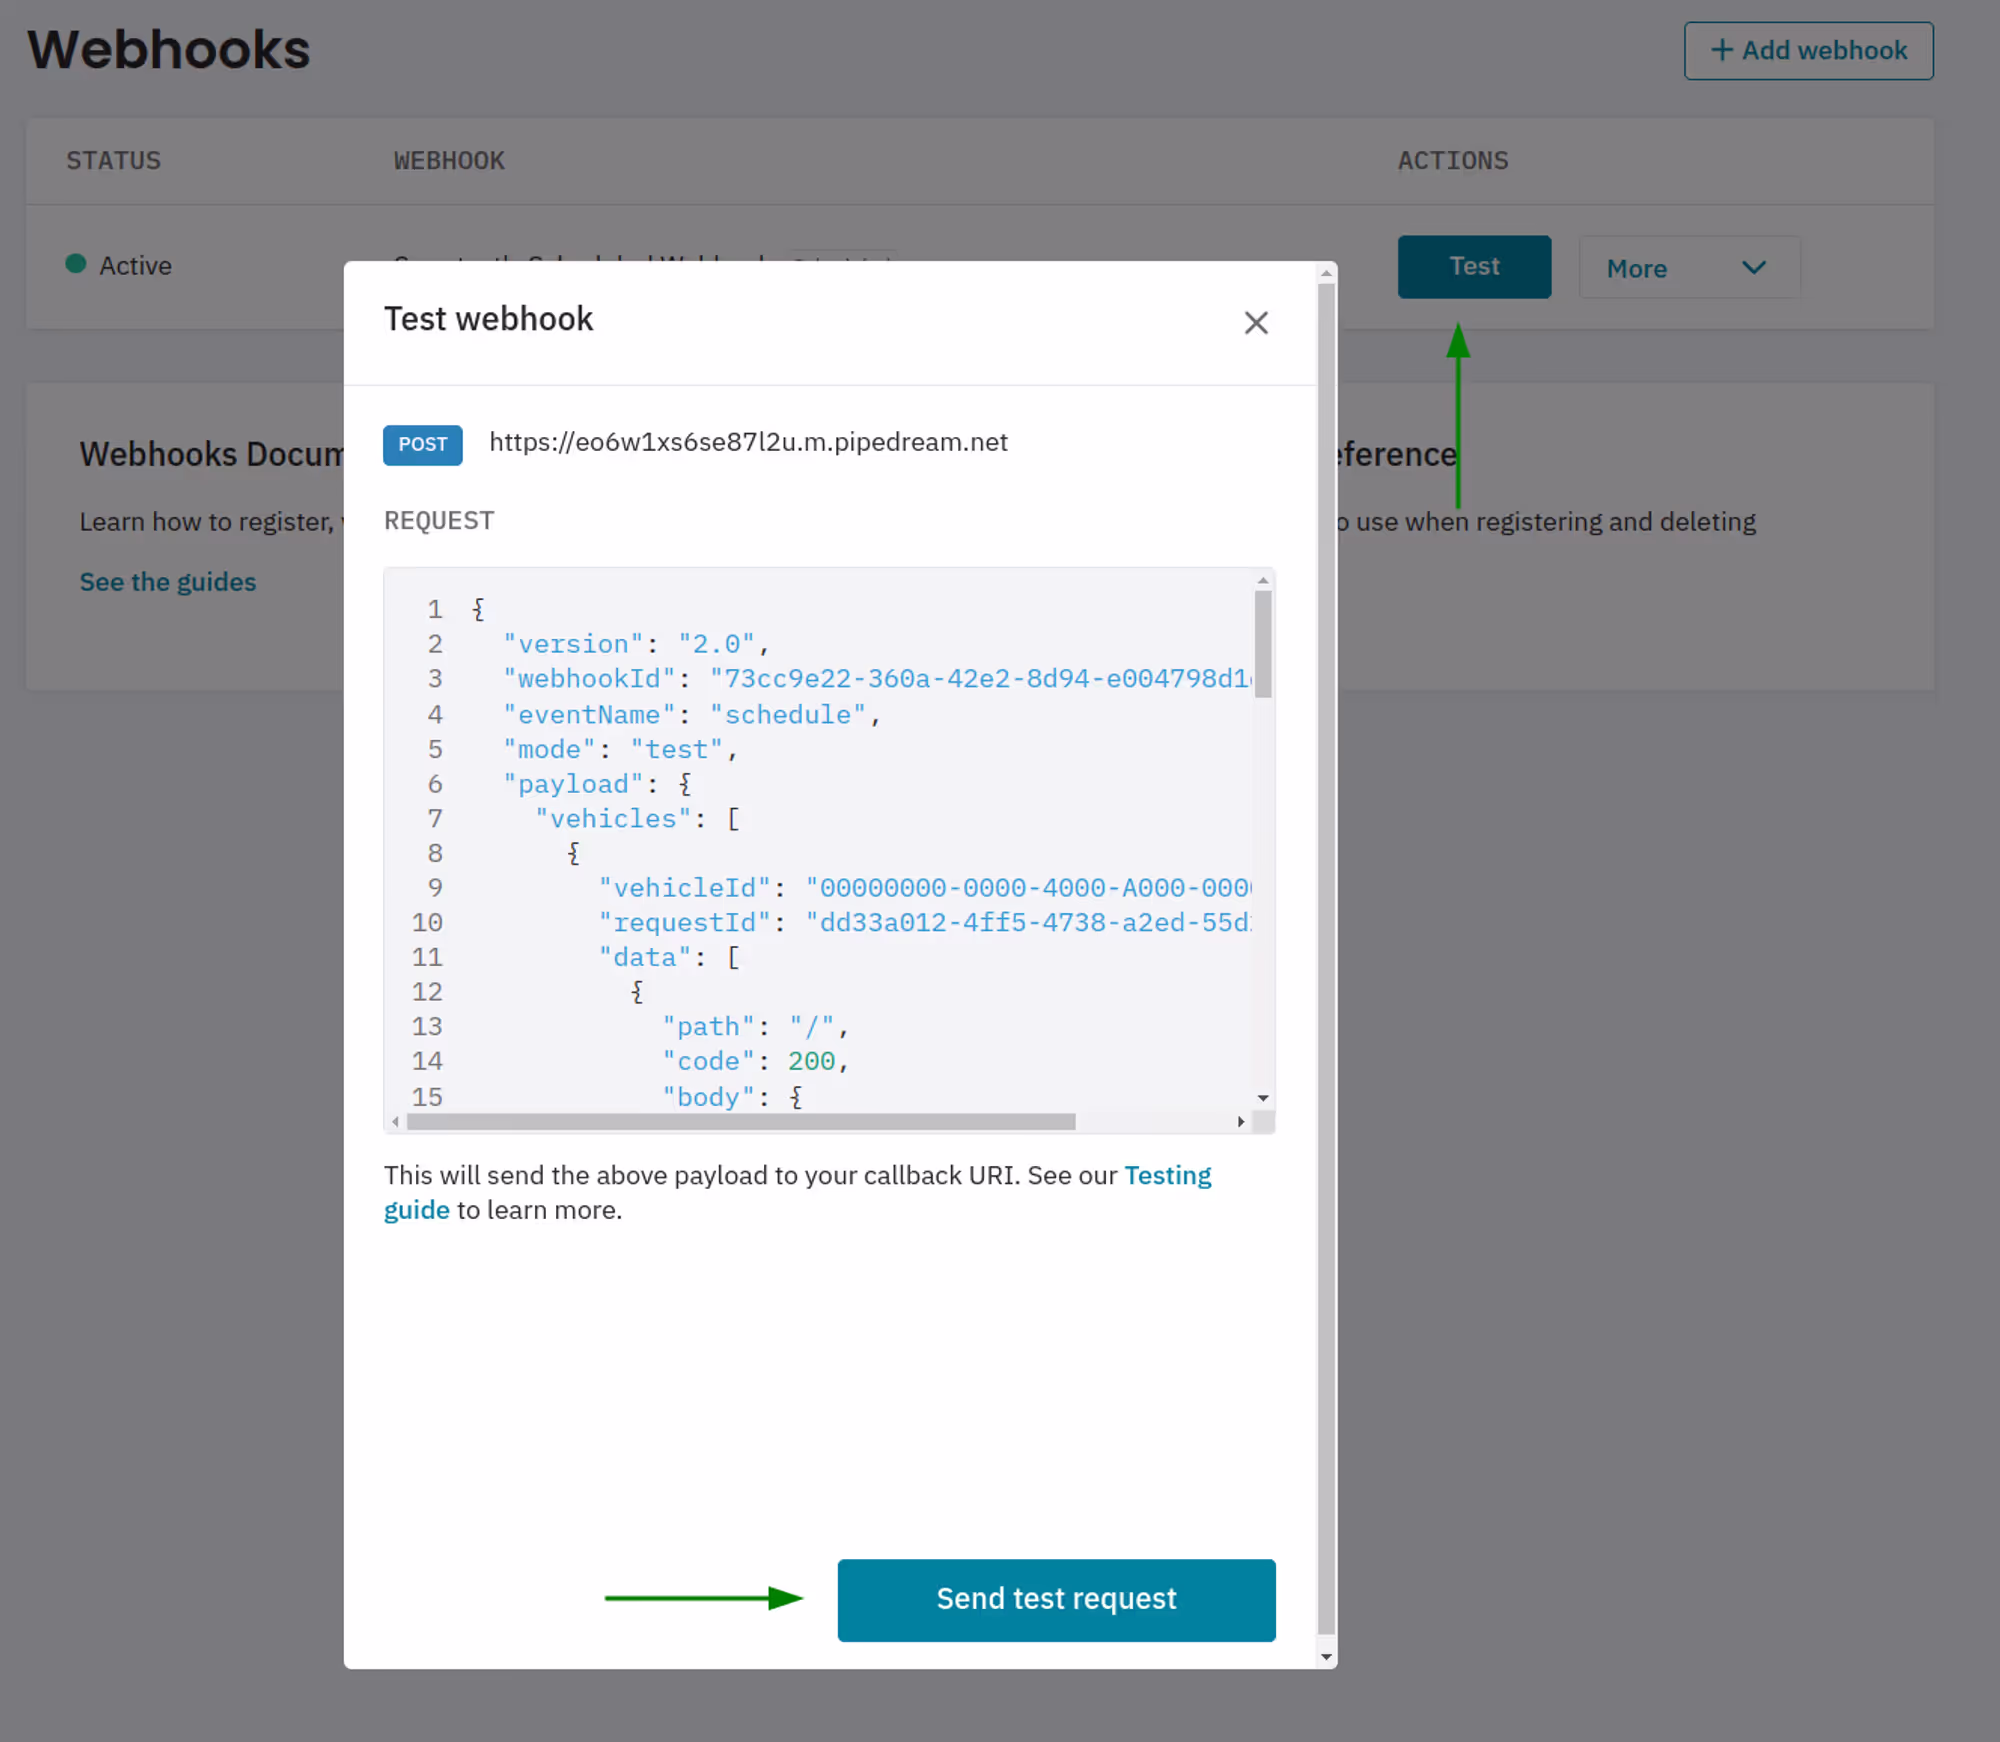
Before we can make changes to our workflow to handle the payload, Pipedream needs a test event to reference as we set it up. To do this, send a test request on the webhook we verified in your Smartcar Dashboard.
🢣 Step 2
Back in your Pipedream workflow, you’ll see a new event pop up under ‘Select Event’ in your trigger step. Select the event and hit ‘Continue.’
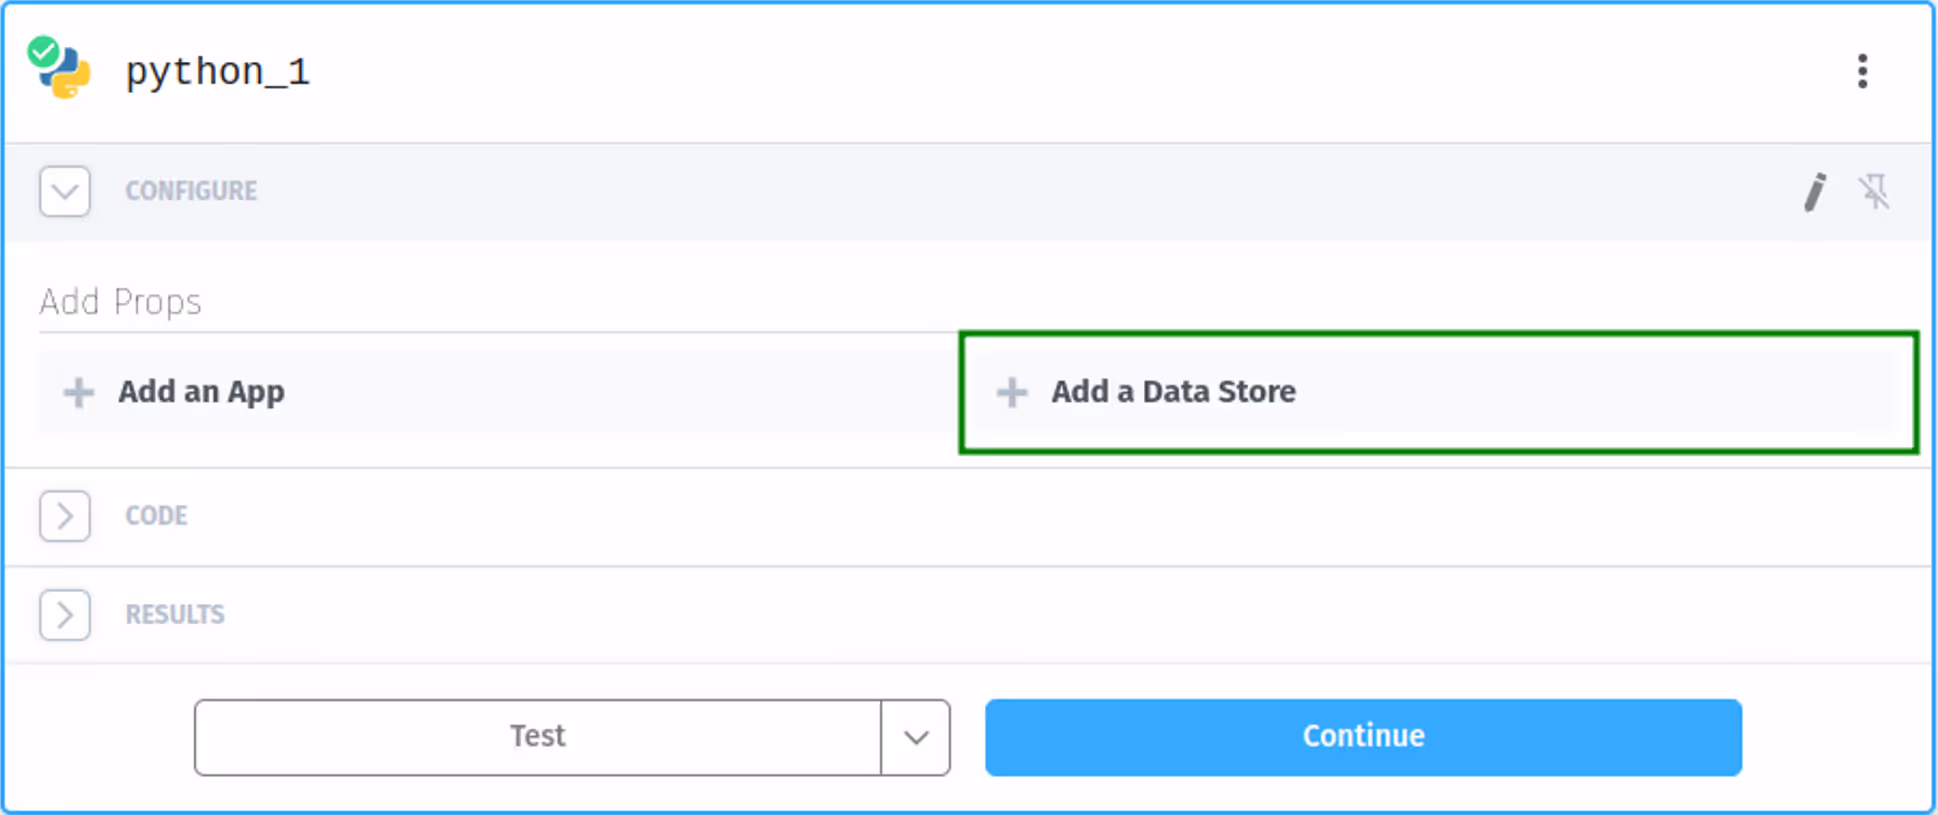
Now, navigate to your Python step in Pipedream (what you created in Part II: Step 3 of this tutorial) and select the data store you created.
🢣 Step 3
Head over to the 'Code' section. We’ll need to add code here so we handle a scheduled webhook payload differently from a verification one. Add the following under our previous `if` statement:
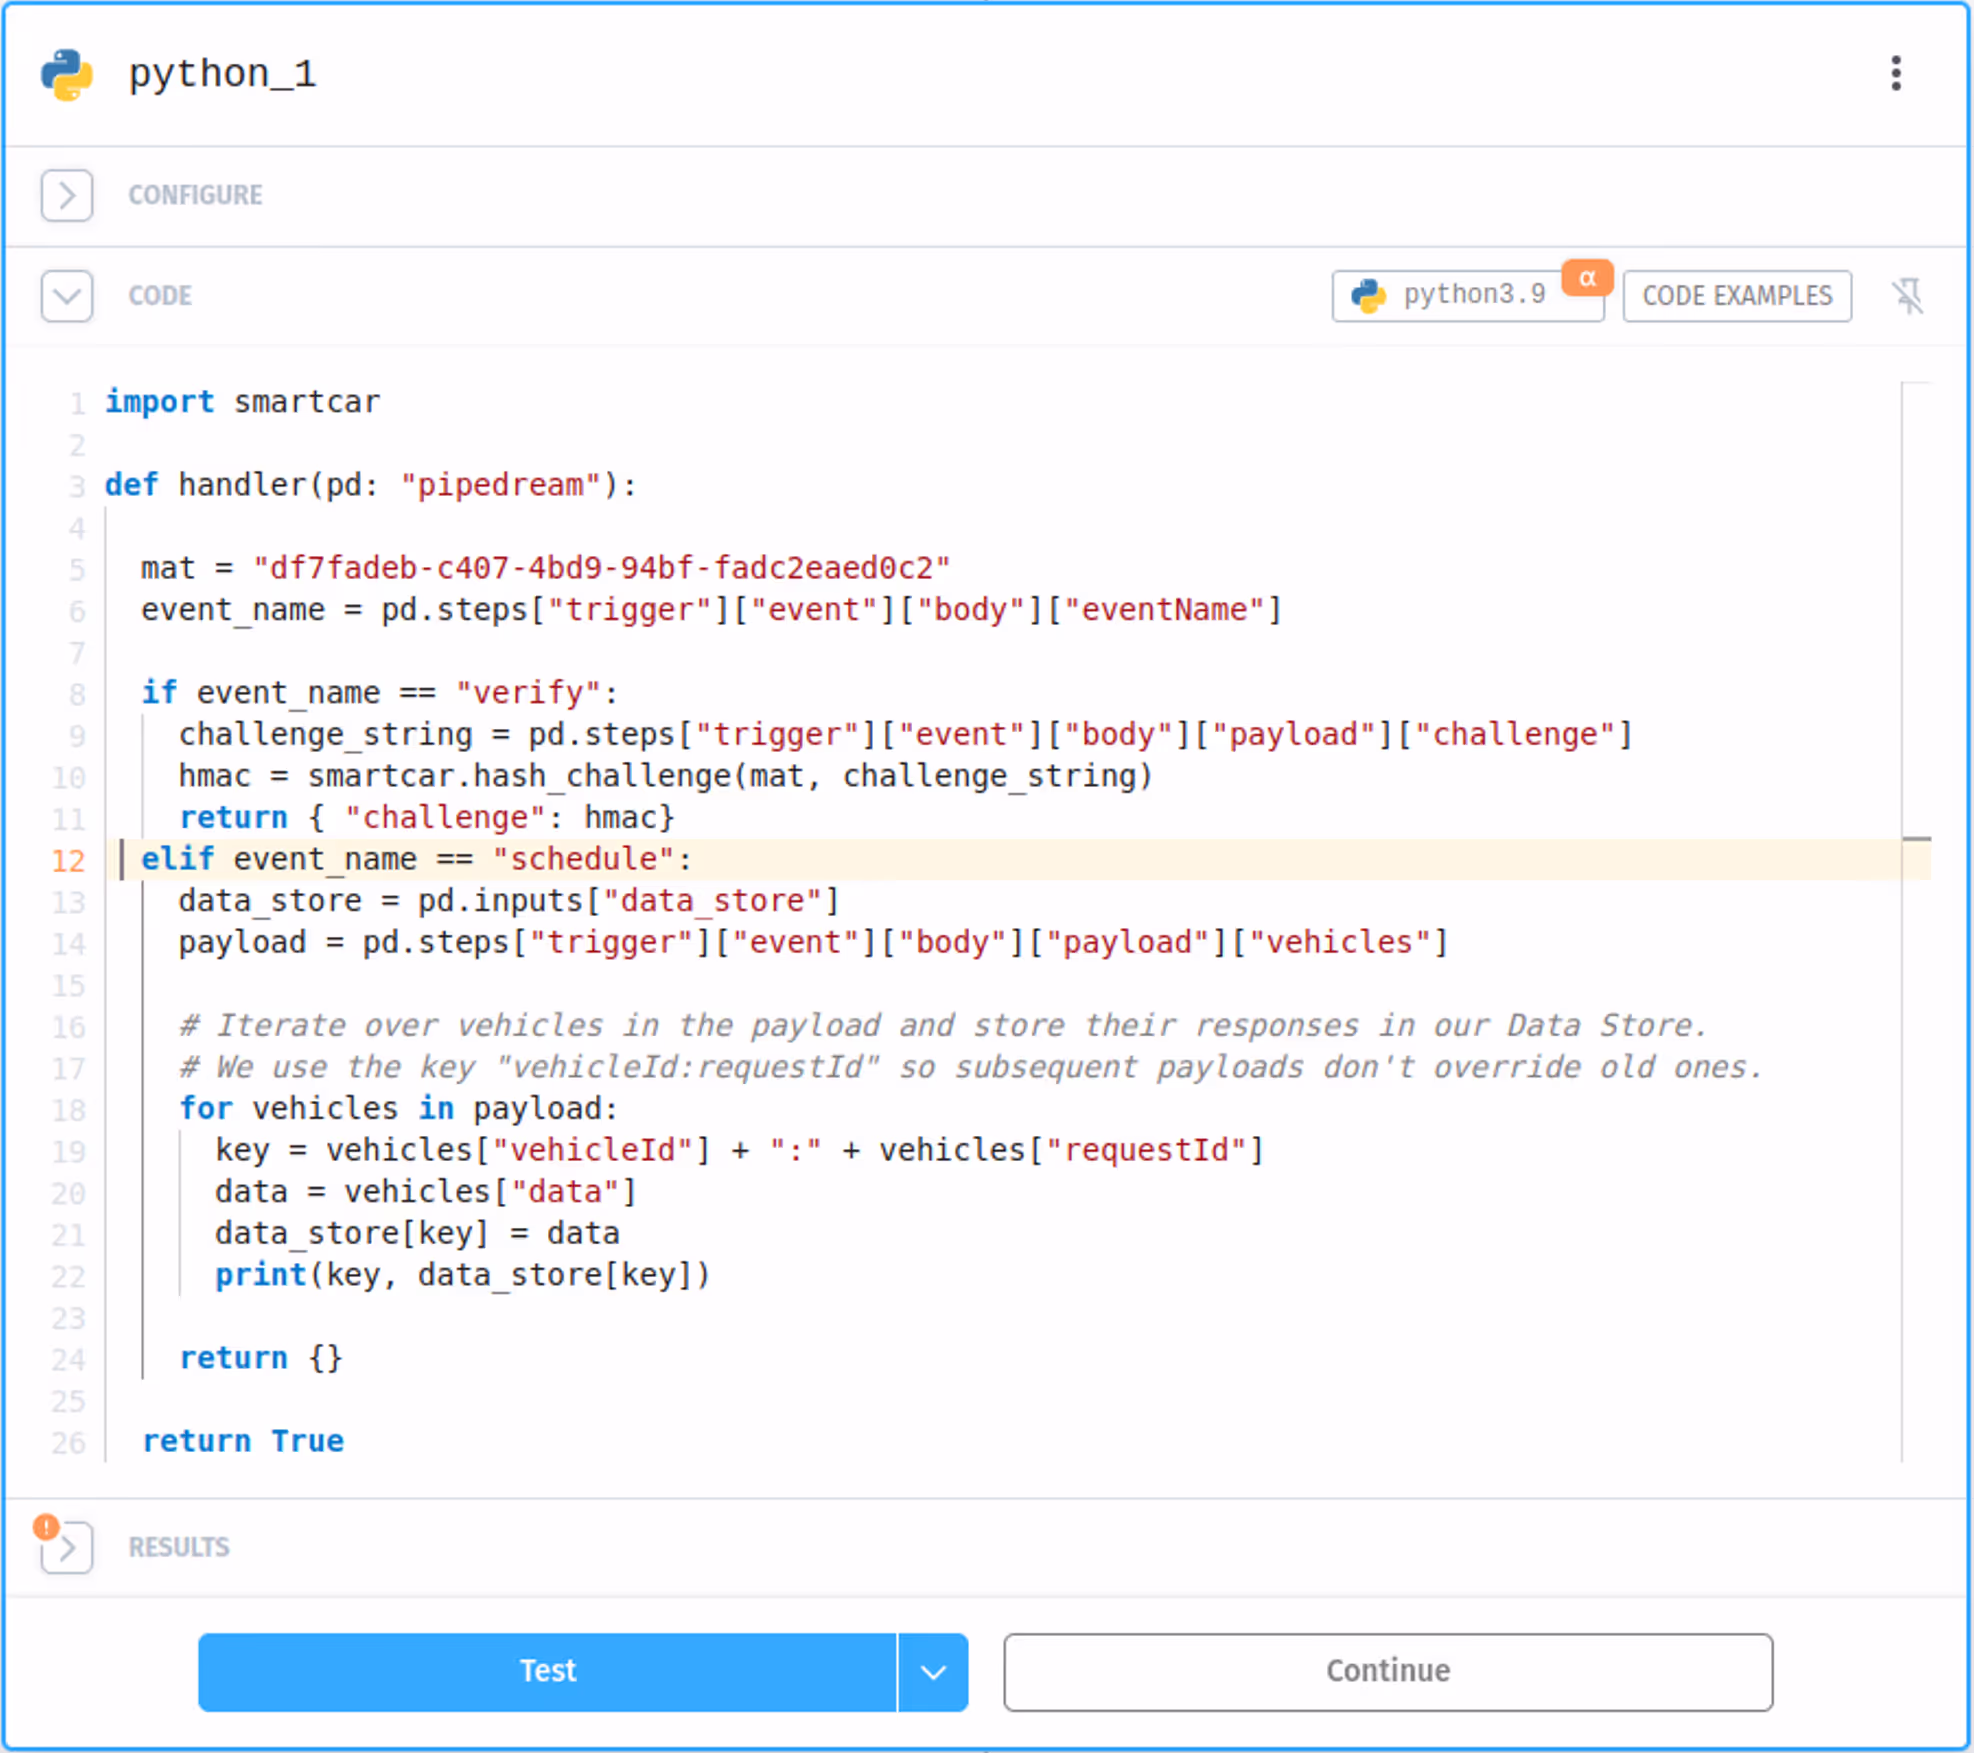
Once you hit 'Test' and switch to the Logs tab, you should see the key we used for this test payload.
🢣 Step 4
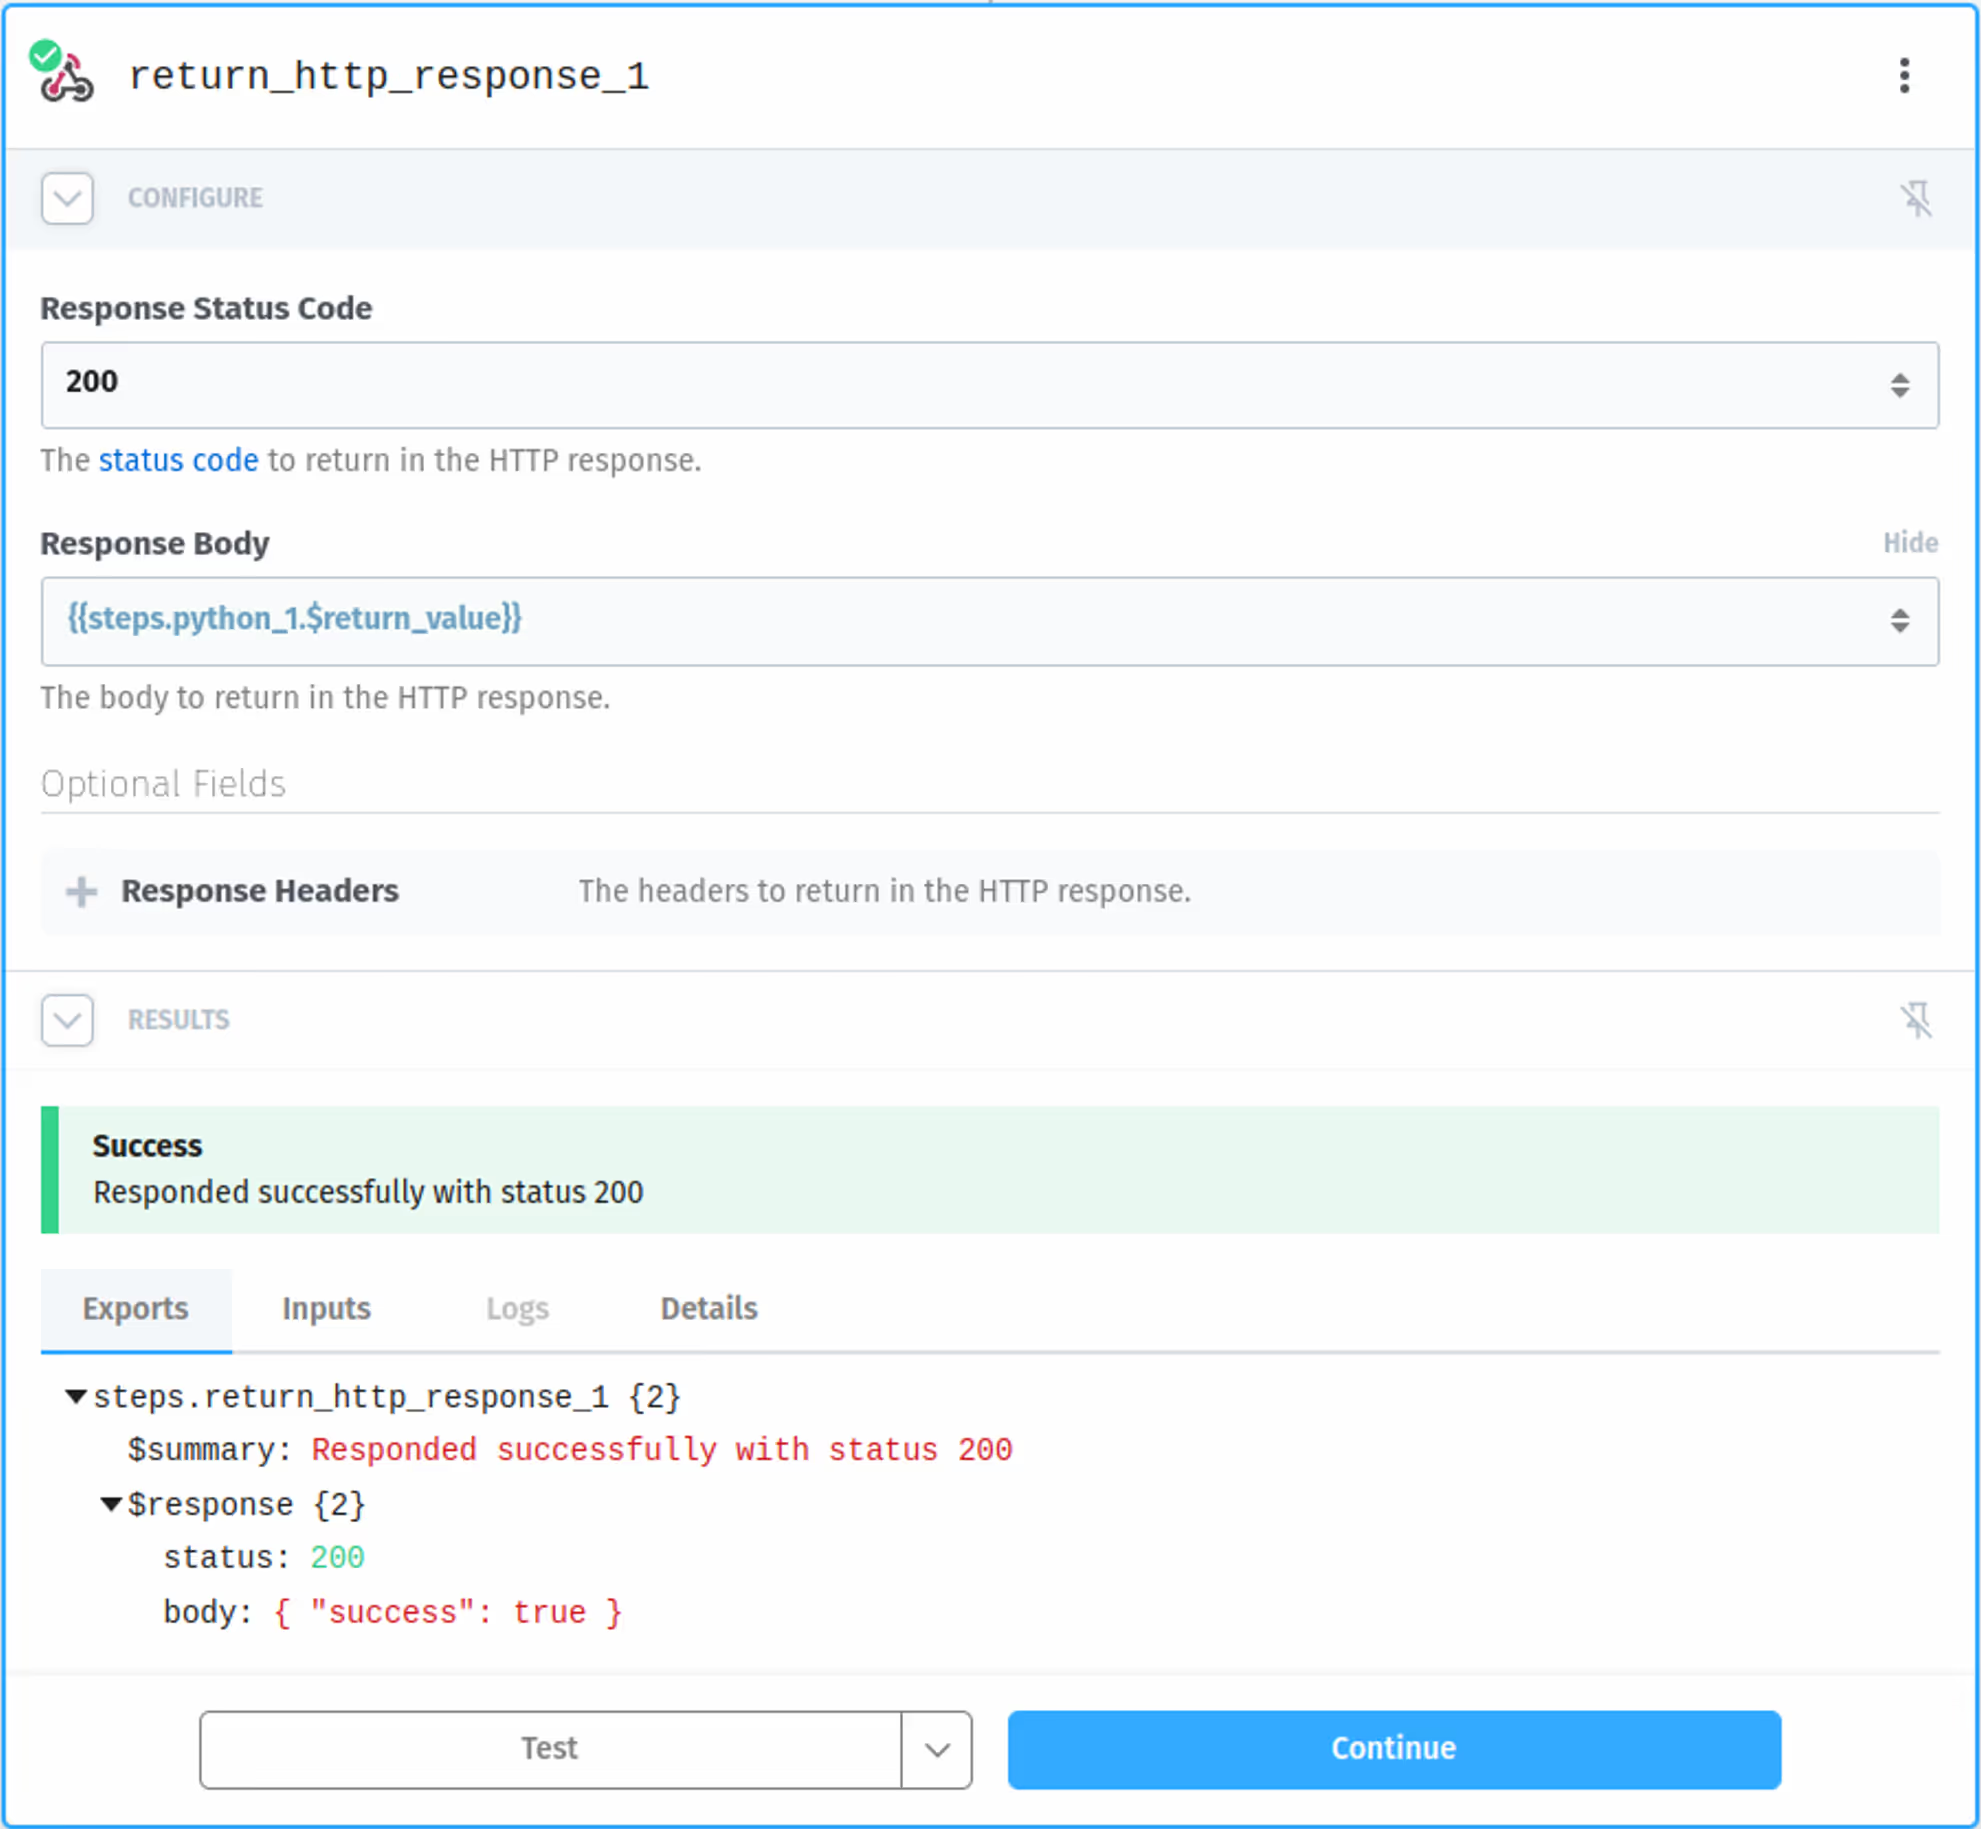
We can leave the Return HTTP Response step (which we created in Part II: Step 4 of this tutorial) as it is because Smartcar still expects a `2XX` response after delivering a payload.
Since we're returning an empty object when `event_name = “schedule”` in our Python step, this step will return `{ "success": true }` in the body by default. You should see the following output after testing this step.
And we’re done! 🥳
If we navigate back to our Data Store, we should see a new entry with data from our initial test request. Pipedream is now set up to handle payloads from a Smartcar Scheduled Webhook.
🪝 Part IV: Working with test vehicles
If you want to schedule data from a test vehicle (or even your own) you can follow one of our integration guides and simply add the `subscribe` helper method in the final step.
In this example, we’re sticking with Python since we used Smartcar's Python SDK earlier in this tutorial.
To find your webhook ID, head over to the 'Webhooks' tab in your Smartcar dashboard and click 'More' > 'View'.
Taking your app experience one step further
When we revamped our Smartcar webhooks with the release of V2.0 of our API, we wanted to give mobility businesses a better experience when receiving app notifications on vehicle events and updates. We're excited to see our scheduled webhooks being used in so many exciting apps across multiple mobility industries!
If you're interested in learning about more event-based webhooks — which are only available for Enterprise customers to use with EV API endpoints — request a demo of Smartcar so our product experts can show you what it's all about.


