> ## Documentation Index
> Fetch the complete documentation index at: https://smartcar.com/docs/llms.txt
> Use this file to discover all available pages before exploring further.
# Important Updates
> Upcoming changes to data access and permissions in 2025
## May 20, 2025
Smartcar now handles adding Virtual Keys for Tesla vehicles on your behalf in the Connect flow. Virtual Keys are required for third-party applications to issue commands to Tesla vehicles and are the preferred method for accessing data.
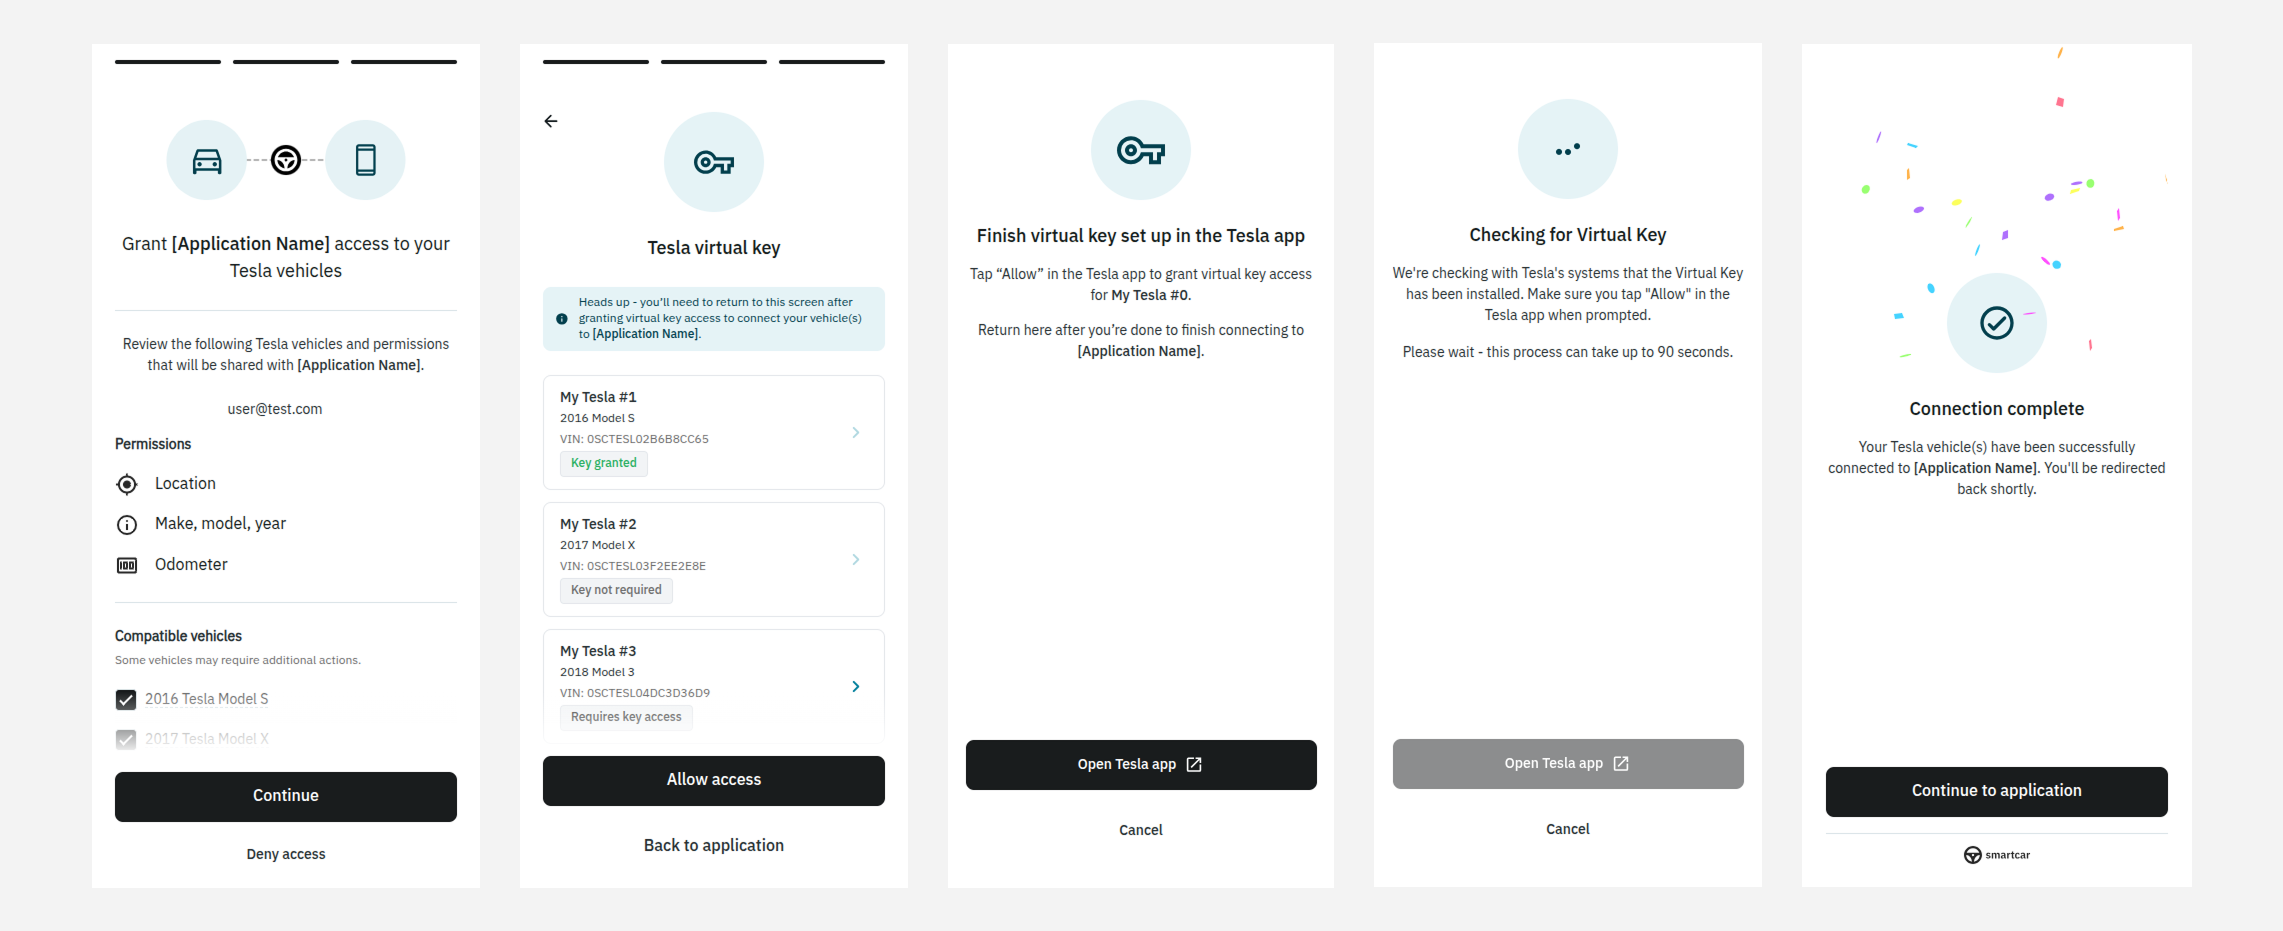 For more details, visit the [Virtual Key documentation](/help/oem-integrations/tesla/virtual-key-tesla).
## January 10, 2025
Starting in March 2025, Tesla will require a new permission to access live
location data for its vehicles. Due to this change, you have two options:
**If your application needs live location data:**
For more details, visit the [Virtual Key documentation](/help/oem-integrations/tesla/virtual-key-tesla).
## January 10, 2025
Starting in March 2025, Tesla will require a new permission to access live
location data for its vehicles. Due to this change, you have two options:
**If your application needs live location data:**
Users will need to reauthenticate and grant explicit access to the Vehicle
Location permission to continue receiving location data beyond March 2025, if
they haven’t already done so. This permission was previously included as part of
the Vehicle Information permission.
**If your application only needs to know whether the vehicle is at home:**
A new boolean value will be available soon, and it will not require
reauthentication. Vehicle owners can set their home location in the Tesla
application.
### Why is this change occurring?
Tesla now provides users more granular data access control, and requires vehicle
owners to explicitly consent to sharing location data with 3rd parties like
Smartcar. This ultimately gives drivers more control and awareness of how and
what data they decide to share.
### Next steps if you need live location data
**1. Check existing permissions**
Use the [User Access](/api-reference/tesla/get-user-access) endpoint to verify whether a vehicle has already
been granted the required permission on Tesla's side.
**2. Update Smartcar Connect scopes**
To ensure vehicle owners grant the new permission, append `required:` to your
scopes in the Smartcar Connect URL (for example, `required:read_location`). For
detailed instructions, please refer to [this guide](/help/oem-integrations/tesla/developers#requiring-tesla-permissions).
**3. Prompt users to reauthenticate**
If needed, guide users to reauthenticate their Tesla vehicles using the methods outlined
[here](/help/oem-integrations/tesla/developers#updating-access-with-tesla).
If the Vehicle Location permission isn’t granted by March 2025, you may
encounter a `PERMISSION` error. As a result, your
application will no longer receive live location data from affected Tesla
vehicles until they reauthenticate.
## December 19, 2024
Starting **January 21, 2025**, a Virtual Key will be required to maintain access to
Tesla vehicle data. Failure to make the necessary changes could result in a
disruption to your service after this date. Below, we’ve outlined the steps you
need to take to prepare, depending on your situation.
### For new developers
If you're on an **Enterprise** plan, please reach out to your Account Manager or
Solutions Architect for information on setting up your own Virtual Key.
**Free** and **Build** customers can get started with the default Virtual Key.
### For existing developers
**What’s changing?**
Telsa is changing the way data can be accessed by 3rd party applications.
**What do you need to do?**
To ensure continuous data access, please have your users add your Virtual Key to
their vehicles if they haven’t already. They can follow [this
guide](https://smartcar.com/docs/help/oem-integrations/tesla/developers#adding-a-virtual-key)
for more information. If you already prompt users to add a Virtual Key as your
application issues commands - no additional work is needed, please continue to
do so.
**What is a Virtual Key?**
A virtual key is a digital access method required by Tesla for third-party
applications to receive vehicle data and issue commands to Tesla vehicles.
Please see [this
guide](https://smartcar.com/docs/help/oem-integrations/tesla/developers#adding-a-virtual-key)
for more information.
**Where can I find my Virtual Key?**
The Virtual Key URL for your application will be sent back along with the
authorization code after a user completes the Connect flow.
Alternatively, you can reach out to Support or your Account Manager and they'll be able to provide
it to you.
**What happens if my users do not add my Virtual Key?**
Starting January 21, 2025 you will not be able to get data from Tesla vehicles
you are connected to and will receive a `virtual_key_required` error instead
([docs](https://smartcar.com/docs/errors/api-errors/connected-services-account-errors#virtual-key-required)).
**What about vehicles that do not support Virtual Keys?**
2020 and earlier Model S and X **do not** require a Virtual Key installation. However, these vehicles can support streaming data access if the owner enables a streaming toggle within the vehicle settings. Smartcar Connect will prompt users about this option and can send email instructions. Without streaming enabled, you may not always receive the latest data from the vehicle when you make an API request to Smartcar.
**Will my users need to reauthenticate?**
No. They simply need to add the Virtual Key to their vehicle.
**What’s changing?**
Tesla is changing the way data can be accessed by 3rd party applications.
**What do you need to do?**
To ensure continuous data access, please have your users add your Virtual Key to their vehicles if they haven’t already. They can
follow [this
guide](https://smartcar.com/docs/help/oem-integrations/tesla/developers#adding-a-virtual-key)
for more information. If you already prompt users to add a Virtual Key as your
application issues commands - no additional work is needed, please continue to
do so.
**What is a Virtual Key?**
A virtual key is a digital access method required by Tesla for third-party
applications to receive vehicle data and issue commands to Tesla vehicles.
Please see [this
guide](https://smartcar.com/docs/help/oem-integrations/tesla/developers#adding-a-virtual-key)
for more information.
**Where can I find my Virtual Key?**
The Virtual Key URL for your application will be sent back along with the
authorization code after a user completes the Connect flow. The Virtual Key URL
is:
[`https://www.tesla.com/_ak/smartcar.com`](https://www.tesla.com/_ak/smartcar.com)
**What happens if my users do not add my Virtual Key?**
Starting January 21, 2025 you will not be able to get data from Tesla vehicles
you are connected to and will receive a `virtual_key_required` error instead
([docs](https://smartcar.com/docs/errors/api-errors/connected-services-account-errors#virtual-key-required)).
**What about vehicles that do not support Virtual Keys?**
2020 and earlier Model S and X **do not** require a Virtual Key installation. However, these vehicles can support streaming data access if the owner enables a streaming toggle within the vehicle settings. Smartcar Connect will prompt users about this option and can send email instructions. Without streaming enabled, you may not always receive the latest data from the vehicle when you make an API request to Smartcar.
**Will my users need to reauthenticate?**
No. They simply need to add the Virtual Key to their vehicle.