> ## Documentation Index
> Fetch the complete documentation index at: https://smartcar.com/docs/llms.txt
> Use this file to discover all available pages before exploring further.
# Backend SDK Tutorials
> In this tutorial, we will go over how to integrate Connect into your application and make requests to a vehicle using our backend SDKs.
# Overview
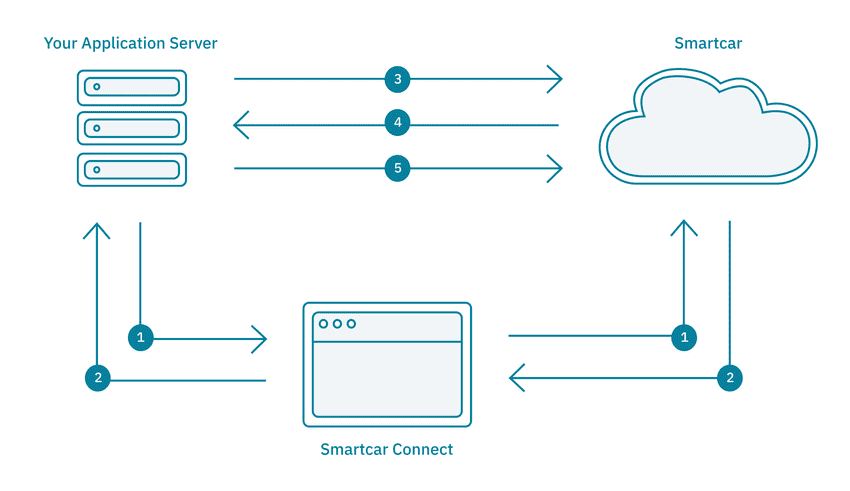
1. The Application redirects the user to Smartcar Connect to request access to the user’s vehicle. In Connect,
the user logs in with their vehicle credentials and grants the Application access to their vehicle.
2. The user’s browser is redirected to a specified `REDIRECT_URI`. The Application Server, which is listening
at the `REDIRECT_URI`, will retrieve the `user_id` and `state` from query parameters sent to the `REDIRECT_URI`.
3. The Application authenticates with the Smartcar API using the [OAuth 2.0 Client Credentials flow](/api-reference/authorization/overview), exchanging its `CLIENT_ID` and `CLIENT_SECRET` for an application-level access token.
4. Using the access token and the `sc-user-id` header, the Application can now send requests to the Smartcar API. It can access protected resources and send commands
to and from the user’s vehicle via the backend service.
# Prerequisites
* [Sign up](https://dashboard.smartcar.com/signup) for a Smartcar account.
* Make a note of your `CLIENT_ID` and `CLIENT_SECRET` from the **Configuration** section on the Dashboard.
* Add the following `REDIRECT_URI` to your application configuration: `http://localhost:8000/exchange`
# Setup
1. Clone the repo for the SDK you want to use and install the required dependencies:
```bash Node theme={null}
$ git clone https://github.com/smartcar/getting-started-express.git
$ cd getting-started-express/tutorial
$ npm install
```
```bash Python theme={null}
$ git clone https://github.com/smartcar/getting-started-python-sdk.git
$ cd getting-started-python-sdk/tutorial
$ pip install -r requirements.txt
```
```bash Java theme={null}
$ git clone https://github.com/smartcar/getting-started-java-sdk.git
$ cd getting-started-java-sdk/tutorial
$ gradlew build
```
```bash Ruby theme={null}
$ git clone https://github.com/smartcar/getting-started-ruby-sdk.git
$ cd getting-started-ruby-sdk/tutorial
$ bundle install
$ ruby app.rb
```
2. You will also have to set the following environment variables
If you've used one of our frontend SDKs to integrate connect, you'll want to set the
`SMARTCAR_REDIRECT_URI` environment variable to the URI you used for that application.
```bash theme={null}
$export SMARTCAR_CLIENT_ID=
$export SMARTCAR_CLIENT_SECRET=
$export SMARTCAR_REDIRECT_URI=http://localhost:8000/exchange
```
If you are using Windows, ensure you are appropriately setting environment variables for your shell.
Please refer to [this post](https://stackoverflow.com/questions/9249830/how-can-i-set-node-env-production-on-windows/9250168#9250168) which details how to set environment variables on Windows.
# Build your Connect URL
1. Instantiate a `Smartcar` object in the constructor of the App component.
```js index.js theme={null}
const client = new smartcar.AuthClient({
mode: 'simulated',
});
```
```python main.py theme={null}
client = smartcar.AuthClient(mode='simulated')
```
```java Main.java theme={null}
String mode = "simulated";
AuthClient client = new AuthClient.Builder()
.mode(mode)
.build();
```
```ruby index.rb theme={null}
@@client = Smartcar::AuthClient.new({
mode: 'simulated',
})
```
Feel free to set `mode` to `simulated` or `live` where you instantiate your `Smartcar` object to
connect to a simulated or real vehicle.
2. A Server-side rendered application will redirect to Smartcar Connect to request access to a user’s vehicle.
On Connect, the user logs in with the username and password for their vehicle’s connected services account
and grants the application access to their vehicle.
To launch Connect, we need to redirect the user to the appropriate URL. We can make use of the `AUTHORIZATION_URL`
function in our Smartcar object and redirect the user to the URL to launch the Connect flow.
```js index.js theme={null}
app.get('/login', function(req, res) {
const scope = ['read_vehicle_info'];
const authUrl = client.getAuthUrl(scope);
res.render('home', {
url: authUrl,
});
});
```
```python main.py theme={null}
@app.route('/login', methods=['GET'])
def login():
scope = ['read_vehicle_info']
auth_url = client.get_auth_url(scope)
return redirect(auth_url)
```
```java Main.java theme={null}
get("/login", (req, res) -> {
// TODO: Authorization Step 2: Launch Smartcar authentication dialog
String[] scope = {"read_odometer"};
String link = client.authUrlBuilder(scope).build();
res.redirect(link);
return null;
});
```
```ruby index.rb theme={null}
get "/login" do
redirect @@client.get_auth_url(['required:read_vehicle_info'])
end
```
# Handle the response
Once a user has authorized the application to access their vehicle, the user is redirected to the `REDIRECT_URI`
with a `user_id` and `state` as query parameters. In the previous section, we had set our `REDIRECT_URI` as `localhost:8000/exchange`.
Now, our server can be set up as follows to receive and store the `user_id`.
```js index.js theme={null}
app.get('/exchange', function(req, res) {
const userId = req.query.user_id;
// Store the user_id — you'll use this as the sc-user-id header
// when making API requests on behalf of this user
console.log('User ID:', userId);
res.sendStatus(200);
});
```
```python main.py theme={null}
@app.route('/exchange', methods=['GET'])
def exchange():
user_id = request.args.get('user_id')
# Store the user_id — you'll use this as the sc-user-id header
# when making API requests on behalf of this user
print('User ID:', user_id)
return '', 200
```
```java Main.java theme={null}
get("/exchange", (req, res) -> {
String userId = req.queryMap("user_id").value();
// Store the user_id — you'll use this as the sc-user-id header
// when making API requests on behalf of this user
System.out.println("User ID: " + userId);
return "";
});
```
```ruby index.rb theme={null}
get "/exchange" do
user_id = params[:user_id]
# Store the user_id — you'll use this as the sc-user-id header
# when making API requests on behalf of this user
puts "User ID: #{user_id}"
"OK"
end
```
# Launching Connect
Let’s try authenticating a vehicle! Restart your server, open up your browser and go to `http://localhost:8000/login`
```bash Node theme={null}
$node index.js
```
```bash Python theme={null}
$python main.py
```
```bash Java theme={null}
$./gradlew run
```
```bash Ruby theme={null}
$bundle exec ruby app.rb
```
This tutorial configures Connect to launch in `test` mode by default.
In `test` mode, any `username` and `password` is valid for each brand.
Smartcar showcases all the permissions your application is asking for - `read_vehicle_info` in this case.
Once you have logged in and accepted the permissions, you should see your authorization `code` printed to your console.
# Getting your application access token
Smartcar uses the OAuth 2.0 Client Credentials flow for API authentication. Your application obtains a single access token that works across all connected vehicles.
Your application needs an access token to make API requests. Unlike the per-vehicle token flow, this token is obtained at the application level and works for all vehicles. The token is valid for **1 hour** — simply request a new one when it expires. There is no refresh token.
After obtaining the token, store the `user_id` from the Connect redirect and redirect to the `/vehicle` route.
```js index.js theme={null}
// Global variable to save our access token and user_id
let accessToken;
let storedUserId;
// Function to get an application-level access token
async function getAccessToken() {
const response = await fetch('https://iam.smartcar.com/oauth2/token', {
method: 'POST',
headers: { 'Content-Type': 'application/x-www-form-urlencoded' },
body: new URLSearchParams({
grant_type: 'client_credentials',
client_id: process.env.SMARTCAR_CLIENT_ID,
client_secret: process.env.SMARTCAR_CLIENT_SECRET,
}),
});
const data = await response.json();
return data.access_token;
}
app.get('/exchange', async function(req, res) {
// Store the user_id from the Connect redirect
storedUserId = req.query.user_id;
// Get an application-level access token
accessToken = await getAccessToken();
res.redirect('/vehicle');
});
```
```python main.py theme={null}
import requests as http_requests
# Global variables
access_token = None
stored_user_id = None
def get_access_token():
"""Get an application-level access token."""
response = http_requests.post(
'https://iam.smartcar.com/oauth2/token',
data={
'grant_type': 'client_credentials',
'client_id': os.environ['SMARTCAR_CLIENT_ID'],
'client_secret': os.environ['SMARTCAR_CLIENT_SECRET'],
}
)
return response.json()['access_token']
@app.route('/exchange', methods=['GET'])
def exchange():
global access_token, stored_user_id
# Store the user_id from the Connect redirect
stored_user_id = request.args.get('user_id')
# Get an application-level access token
access_token = get_access_token()
return redirect('/vehicle')
```
```java Main.java theme={null}
// Global variables
private static String accessToken;
private static String storedUserId;
private static String getAccessToken() throws Exception {
HttpURLConnection conn = (HttpURLConnection) new URL("https://iam.smartcar.com/oauth2/token").openConnection();
conn.setRequestMethod("POST");
conn.setDoOutput(true);
conn.setRequestProperty("Content-Type", "application/x-www-form-urlencoded");
String body = "grant_type=client_credentials"
+ "&client_id=" + System.getenv("SMARTCAR_CLIENT_ID")
+ "&client_secret=" + System.getenv("SMARTCAR_CLIENT_SECRET");
conn.getOutputStream().write(body.getBytes());
// Parse the JSON response to extract access_token
// In production, use a JSON library
Scanner scanner = new Scanner(conn.getInputStream()).useDelimiter("\\A");
String response = scanner.hasNext() ? scanner.next() : "";
return new Gson().fromJson(response, JsonObject.class).get("access_token").getAsString();
}
public static void main(String[] args) {
get("/exchange", (req, res) -> {
// Store the user_id from the Connect redirect
storedUserId = req.queryMap("user_id").value();
// Get an application-level access token
accessToken = getAccessToken();
res.redirect("/vehicle");
return null;
});
}
```
```ruby index.rb theme={null}
require 'net/http'
require 'json'
# Global variables
@@access_token = ''
@@stored_user_id = ''
def get_access_token
uri = URI('https://iam.smartcar.com/oauth2/token')
response = Net::HTTP.post_form(uri, {
'grant_type' => 'client_credentials',
'client_id' => ENV['SMARTCAR_CLIENT_ID'],
'client_secret' => ENV['SMARTCAR_CLIENT_SECRET']
})
JSON.parse(response.body)['access_token']
end
get "/exchange" do
# Store the user_id from the Connect redirect
@@stored_user_id = params[:user_id]
# Get an application-level access token
@@access_token = get_access_token
redirect '/vehicle'
end
```
# Getting data from a vehicle
1. Once the backend service has an application-level access token and the `user_id`, it can send requests to a vehicle using the Smartcar API.
First we'll need to fetch the connections for this user, then fetch vehicle attributes. After
receiving the vehicle attributes, we can render them in a simple table on the page.
```js index.js theme={null}
app.get('/vehicle', async function(req, res) {
// Use the Connections API to get vehicle IDs for this user
const connectionsResponse = await fetch(
'https://vehicle.api.smartcar.com/v3/connections',
{
headers: {
'Authorization': `Bearer ${accessToken}`,
'sc-user-id': storedUserId,
},
}
);
const { connections } = await connectionsResponse.json();
// Get vehicle info for the first connected vehicle
const vehicleResponse = await fetch(
`https://vehicle.api.smartcar.com/v3/vehicles/${connections[0].vehicleId}`,
{
headers: {
'Authorization': `Bearer ${accessToken}`,
'sc-user-id': storedUserId,
},
}
);
const attributes = await vehicleResponse.json();
res.render('vehicle', {
info: attributes,
});
});
```
```python main.py theme={null}
@app.route('/vehicle', methods=['GET'])
def get_vehicle():
global access_token, stored_user_id
headers = {
'Authorization': f'Bearer {access_token}',
'sc-user-id': stored_user_id,
}
# Use the Connections API to get vehicle IDs for this user
connections_resp = http_requests.get(
'https://vehicle.api.smartcar.com/v3/connections',
headers=headers,
)
connections = connections_resp.json()['connections']
# Get vehicle info for the first connected vehicle
vehicle_resp = http_requests.get(
f'https://vehicle.api.smartcar.com/v3/vehicles/{connections[0]["vehicleId"]}',
headers=headers,
)
attributes = vehicle_resp.json()
return jsonify({
"make": attributes["make"],
"model": attributes["model"],
"year": attributes["year"]
})
```
```java Main.java theme={null}
get("/vehicle", (req, res) -> {
// Use the Connections API to get vehicle IDs for this user
HttpURLConnection connReq = (HttpURLConnection) new URL(
"https://vehicle.api.smartcar.com/v3/connections"
).openConnection();
connReq.setRequestProperty("Authorization", "Bearer " + accessToken);
connReq.setRequestProperty("sc-user-id", storedUserId);
Scanner scanner = new Scanner(connReq.getInputStream()).useDelimiter("\\A");
String connResponse = scanner.hasNext() ? scanner.next() : "";
JsonArray connections = new Gson().fromJson(connResponse, JsonObject.class)
.getAsJsonArray("connections");
String vehicleId = connections.get(0).getAsJsonObject().get("vehicleId").getAsString();
// Get vehicle info for the first connected vehicle
HttpURLConnection vehReq = (HttpURLConnection) new URL(
"https://vehicle.api.smartcar.com/v3/vehicles/" + vehicleId
).openConnection();
vehReq.setRequestProperty("Authorization", "Bearer " + accessToken);
vehReq.setRequestProperty("sc-user-id", storedUserId);
scanner = new Scanner(vehReq.getInputStream()).useDelimiter("\\A");
String vehResponse = scanner.hasNext() ? scanner.next() : "";
res.type("application/json");
return vehResponse;
});
```
```ruby index.rb theme={null}
get "/vehicle" do
# Use the Connections API to get vehicle IDs for this user
uri = URI('https://vehicle.api.smartcar.com/v3/connections')
req = Net::HTTP::Get.new(uri)
req['Authorization'] = "Bearer #{@@access_token}"
req['sc-user-id'] = @@stored_user_id
conn_response = Net::HTTP.start(uri.hostname, uri.port, use_ssl: true) { |http| http.request(req) }
connections = JSON.parse(conn_response.body)['connections']
# Get vehicle info for the first connected vehicle
vehicle_id = connections.first['vehicleId']
uri = URI("https://vehicle.api.smartcar.com/v3/vehicles/#{vehicle_id}")
req = Net::HTTP::Get.new(uri)
req['Authorization'] = "Bearer #{@@access_token}"
req['sc-user-id'] = @@stored_user_id
veh_response = Net::HTTP.start(uri.hostname, uri.port, use_ssl: true) { |http| http.request(req) }
JSON.parse(veh_response.body).to_json
end
```
2. Restart your sever and head back to `http://localhost:8000/login` to go through Connect and make your first API request!
```bash Node theme={null}
$node index.js
```
```bash Python theme={null}
$python main.py
```
```bash Java theme={null}
$./gradlew run
```
```bash Ruby theme={null}
$bundle exec ruby app.rb
```